• chevron_right

      3D-printed Mac replica is a maker masterwork inside an entirely accurate shell

      news.movim.eu / ArsTechnica · Tuesday, 19 March - 22:24 · 1 minute

    Booted Mac replica with MacPaint open,

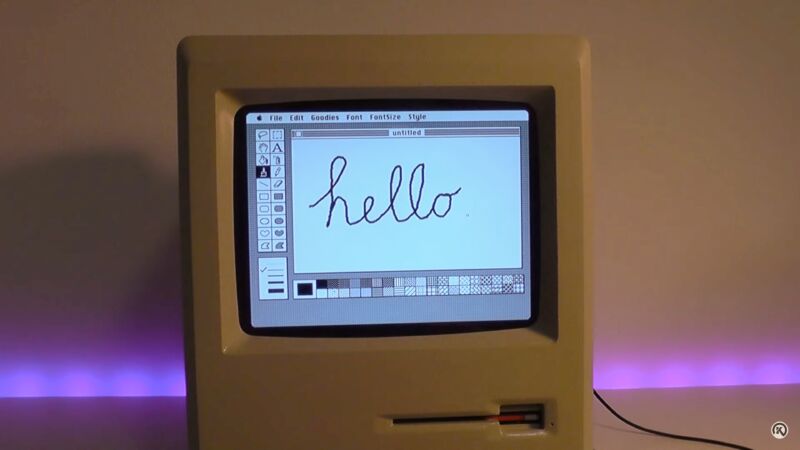
    Enlarge (credit: Kevin Noki)

    Have you ever worked on a hobby project where modifying and compiling the source code for a Linux-based emulator was possibly the easiest and most straightforward part of the whole thing?

    Kevin Noki really, really wanted a functioning Macintosh Plus, complete with a functioning, auto-ejecting disk drive that it could boot from. The German maker already had a Mac Plus (1Mb) from eBay, but it had both a busted power supply and floppy drive. Rather than carve out the busted Plus' one-of-a-kind internals and slap a Raspberry Pi in there like some DIY slacker, Noki went … a different path.

    47 minutes and 25 seconds of a tour-de-force of modern maker technology.

    Noki 3D-printed his own Macintosh , the "Brewintosh." I would like you to consider what you think that last sentence means and then wipe your expectations clean. I have watched the entire 48-minute journey of Noki's Brewintosh, which is both very soothing on some ASMR -adjacent gut level and also low-key maddening for the way it plays down all the individual accomplishments along the way. Any one of the Brewintosh's pieces would be my entire weekend, and my spouse would not enjoy my mood while I was sunk into it.

    Read 5 remaining paragraphs | Comments

    • chevron_right

      Envie de construire votre propre robot chien ?

      news.movim.eu / Korben · Sunday, 17 September, 2023 - 07:00 · 2 minutes

    Voici un projet de robotique incroyable dont je ne peux pas m’empêcher de vous parler ! Il s’agit du projet LOTP qui est un robot quadrupède modulaire (un chien robot quoi…) qui peut s’adapter à nombreuses situations. Oui, tout à fait comme le cyber toutou Spot de Boston Dynamics, mais en DIY total !

    Ce petit chien robot a remporté plusieurs prix et est capable de réaliser différentes tâches, comme de la surveillance ou encore du transport dans des environnements industriels.

    Il se compose d’une unité centrale chargée de gérer les calculs, ainsi que des modules Wi-Fi, GPS et gyroscope pour contrôler son orientation. Pour assurer son alimentation électrique et réguler la tension nécessaire au fonctionnement des différents composants électroniques (comme les servomoteurs), il dispose de packs de batteries LiPo équipés d’un régulateur. Les jambes du toutou quant à elles disposent d’un ensemble de capteurs permettant d’ajuster leur position en fonction des forces exercées.

    Le coeur du projet repose évidemment sur une carte Arduino Micro qui communique avec la télécommande par Wi-Fi. Cette télécommande faite elle aussi maison, est dotée d’une paire de joysticks et dispose d’un écran LCD pour afficher les menus de contrôle ainsi que les données issues des capteurs.

    Ce robot dispose de 3 mouvements autonomes intégrés dans ses programmes : le maintien de l’équilibre sur une surface courbe, l’ajustement de la hauteur du corps sous l’effet de la pression et l’évitement des obstacles. Pour parvenir à cela, le système utilise les valeurs extraites du gyroscope, des capteurs de pression et du capteur Lidar qui tourne à 360 degrés.

    Le robot est également équipé d’un détecteur de gaz dangereux et peut même servir de station mobile en lançant un petit drone ! Si vous êtes intéressé par des détails de ce projet, je vous recommande d’ailleurs vivement d’aller faire un tour sur la chaîne YouTube Limenitis Reducta .

    Il y a là une mine d’or pour les amateurs de robotique. Avec tout ça, vous serez capable d’apprendre à construire votre propre robot chien, mais aussi comment écrire du code pour contrôler sa marche et sa posture. Si vous le faites, faudra vraiment m’envoyer des vidéos et des photos !

    Plus d’infos ici

    • chevron_right

      Open source espresso machine is one delicious rabbit hole inside another

      news.movim.eu / ArsTechnica · Tuesday, 28 March, 2023 - 17:41 · 1 minute

    Opened-up espresso maker on a kitchen counter

    Enlarge / How far is too far to go for the perfect shot of espresso? Here's at least one trail marker for you. (credit: Norm Sohl)

    Making espresso at home involves a conundrum familiar to many activities: It can be great, cheap, or easy to figure out, but you can only pick, at most, two of those. You can spend an infinite amount of time and money tweaking and upgrading your gear, chasing shots that taste like the best café offerings, always wondering what else you could modify.

    Or you could do what Norm Sohl did and build a highly configurable machine out of open source hardware plans and the thermal guts of an Espresso Gaggia . Here's what Sohl did, and some further responses from the retired programmer and technical writer, now that his project has circulated in both open hardware and espresso-head circles.

    Like many home espresso enthusiasts, Sohl had seen that his preferred machine, the Gaggia Classic Pro, could be modified in several ways, including adding a proportional–integral–derivative (PID) controller and other modifications to better control temperature, pressure, and shot volumes. Most intriguing to Sohl was Gaggiuino , a project that adds those things with the help of an Arduino Nano or STM32 Blackpill , a good deal of electrical work, and open software.

    Read 8 remaining paragraphs | Comments

    • On chevron_right

      CO and LPG gas sensor with Arduino and LCD

      pubsub.slavino.sk / onetransistor · Sunday, 15 January, 2023 - 14:09 edit

    In a previous post I looked at a MQ-9 sensor module. Unfortunately, although the sensor can detect CO and LPG, it cannot be used as it is wired in the module. After analyzing the datasheet I figured the best thing to do is remove it from existing PCB and build my own. In short, like other sensors from MQ family, MQ-9 has a heater resistor inside. In order to get any useful reading from it, this resistor must be heated at 5 V for 60 seconds, then cooled at 1.4 V for 90 seconds. The same is true for MQ-7. The issue with modules is that all sensors from MQ family are fitted on the same PCB design.

    In this post, I'll share two other methods of powering the heater resistor and I will design a PCB. Sensor readings will be displayed on an alphanumeric LCD powered by Arduino. Since real ppm is temperature and humidity dependent, I will provide a PCB header for DHT sensor. I already tested the sensor with the LM317 power supply I built in the previous post, and I did some measurements.

    CO and LPG gas sensor with Arduino and LCD
    Read more

    Značky: #Gas, #Sensor, #Electronics, #Elektro, #MQ-9, #Arduino

    • On chevron_right

      Influence of temperature and humidity on MQ gas sensors

      pubsub.slavino.sk / onetransistor · Saturday, 14 January, 2023 - 17:09 edit

    I dedicated some of my previous posts to MQ gas sensors. These devices are cheap and can be bought on PCB modules, which implement a simple comparator circuit in order to provide a digital output. However, the usability of these modules is rather limited, knowing that some of the sensors from MQ family require variable heater voltage. More than this, at power-up the resistance of the sensor is low until the heater reaches working temperature, therefore the comparator output of a sensor module will trigger a false alarm.

    Although this is not an important limitation, the modules do not take into account the variation of sensor resistance based on environment temperature and humidity. To do this, a microcontroller must sample the sensor resistance through an ADC and estimate gas concentration. This post continues a previous one in which I estimated gas ppm after extracting sensitivity data from datasheet graphs. However...

    Influence of temperature and humidity on MQ gas sensors

    Read more

    Značky: #Elektro, #MQ-2, #Software, #Sensor, #Arduino

    • On chevron_right

      Compute ppm of MQ sensors from datasheet graphs

      pubsub.slavino.sk / onetransistor · Saturday, 31 December, 2022 - 19:34 edit

    I tried to connect some of the gas sensor modules I have bought over time to Arduino. Unfortunately, I discovered these modules were not designed properly and require some modifications in order to power sensors according to datasheet specifications. I am using an MQ-2 type sensor for this test and all of the following estimations will be specific for this type of sensor. You can use the same approach to read and process analog input of any of the other sensors from MQ family.

    You won't find in any of the available datasheets a direct, clear formula to approximate ppm of a gas based on the sensor resistance. But there are some sensitivity graphs which we can use to find a correlation. To make things even more complicated, for MQ-2 there are two datasheets available, from different manufacturers, with different sensitivity data.

    Compute ppm of MQ sensors from datasheet graphs

    Read more

    Značky: #Sensor, #Software, #MQ-2, #Arduino, #Elektro

    • On chevron_right

      Attempts at reading data from MQ-2 gas sensor (2)

      pubsub.slavino.sk / onetransistor · Friday, 30 December, 2022 - 21:16 edit

    MQ-2 is a gas leakage detecting sensor with good sensitivity to a wide range of gases. Since you can get most MQ sensor on ready-made modules, people are interfacing those with development boards. However, the modules are far from perfect. Some of the sensors require variable heater voltages. This is not the case for MQ-2. Since I own a module with this sensor and it can probably be used as is, I decided to make some tests while I'm waiting a PCB for MQ-9 to be manufactured and shipped.

    In the previous post I explained why modules with MQ-7 and MQ-9 are no good. Now, I'm about to discover the same for MQ-2. I thought I could use the module as is, since I am more interested in finding a method of computing useful data from the analog output of the sensor. With an Arduino compatible board and an MQ-2 module I will attempt to get ppm values. But not before some parts swapping.

    MQ-2 test fixture, with sensor exposed to alcohol
    MQ-2 test fixture, with sensor exposed to alcohol

    Read more

    Značky: #Elektro, #Gas, #Sensor, #Electronics, #MQ-2, #Arduino

    • chevron_right

      Meet Ghostwriter, a haunted AI-powered typewriter that talks to you

      news.movim.eu / ArsTechnica · Wednesday, 14 December, 2022 - 21:54

    Ghostwriter understands what you type and can automatically write responses using OpenAI's GPT-3.

    Enlarge / Ghostwriter understands what you type and can automatically write responses using OpenAI's GPT-3. (credit: Arvind Sanjeev / Ars Technica)

    On Wednesday, a designer and engineer named Arvind Sanjeev revealed his process for creating Ghostwriter, a one-of-a-kind repurposed Brother typewriter that uses AI to chat with a person typing on the keyboard. The "ghost" inside the machine comes from OpenAI's GPT-3 , a large language model that powers ChatGPT . The effect resembles a phantom conversing through the machine.

    To create Ghostwriter, Sanjeev took apart an electric Brother AX-325 typewriter from the 1990s and reverse-engineered its keyboard signals, then fed them through an Arduino , a low-cost microcontroller that is popular with hobbyists. The Arduino then sends signals to a Raspberry Pi that acts as a network interface to OpenAI's GPT-3 API.

    When GPT-3 responds, Ghostwriter noisily types the AI model's output onto paper automatically.

    Read 6 remaining paragraphs | Comments

    • On chevron_right

      Useless sensor modules based on MQ-7 and MQ-9 (1)

      pubsub.slavino.sk / onetransistor · Sunday, 11 December, 2022 - 16:51 edit · 1 minute

    When shopping for electronics parts and modules, I oftentimes add to cart things I didn't plan to buy, since most suppliers offer free shipping when total order amount is above a threshold. This was the case with a module I bought recently, a carbon monoxide and LPG detector based on MQ-9 sensor. When I got the time to build a breadboard circuit to test it, I came across a problem. As with most modules and devices, I started with MQ-9 datasheet. And at first I did not quite understand what they were saying about high and low heater voltage.

    And the internet is full of examples regarding such modules interfaced to Arduino. And everybody seems to be powering it from 5 V, while some even developed code with advanced calculations to get real ppm value from the sensor. Throughout reading of the datasheets of both MQ-7 and MQ-9 reveals a "detail" everybody seems to have missed. In this post I will show you the correct way of using MQ carbon monoxide sensors. Keep in mind that CO and LPG are dangerous gases and if you need a detector, you should always buy a professionally manufactured one which is also properly calibrated.

    Useless sensor modules based on MQ-7 and MQ-9
    MQ-9 ready for testing

    Read more

    Značky: #Elektro, #MQ-9, #Sensor, #Gas, #Electronics, #Arduino