• chevron_right

      How to Enable Microsoft Edge’s New ‘Kids Mode’

      pubsub.dcentralisedmedia.com / LifehackerAustralia · Friday, 19 February, 2021 - 18:00 · 2 minutes

    Microsoft is testing a new “Kids Mode” for Edge that makes the browser safer for younger users with just a few clicks.

    How to Try Out the Upcoming Firefox Redesign Now

    Later this year, Mozilla will update Firefox’s desktop design with the new Proton interface. The visual overhaul is expected to include:

    Read more

    Edge already has several family features, but those settings must be manually set up and apply to all users in a family group. Kids Mode, however, can be turned on or off by the parents and comes with heightened security and content filters built-in, including blocked sites, Bing Safe Search, and family-friendly browser themes.

    Kids Mode is still in development, but you can try it out early in the latest Edge Canary build. It will come to the developer build next, then should be available in the stable build sometime in the future. If you download Edge Canary for Kids mode, keep in mind it will install as a separate version of Edge — so if you’re trying to keep your kids away from certain content, you’ll need to make sure they’re using Edge Canary instead of the normal version. It’s also important to note that Edge Canary is full of other unfinished features and settings, which could cause occasional crashes and other errors.

    How to enable Kids Mode

    Whether you test Edge’s Kids Mode out early or wait for it to come to a more stable version, turning it on is easy: Open the browser, then click the Profile image in the upper-right, and select “Kids Mode.”

    With Kids Mode on, Edge will prevent access to a list of pre-determined websites, which can be modified by going to Settings > Family S afety . This menu also includes activity reports and lets you manage all the other profiles and devices used by your family. Bing will also be permanently set to ‘Safe Search’ when the browser is in Kids Mode.

    Finally, Kids Mode can be customised with its own kid-friendly browser themes — just click the settings icon from a new tab and click “Custom, and then “Manage” under “Background Image.”

    [ The Verge ]

    The post How to Enable Microsoft Edge’s New ‘Kids Mode’ appeared first on Lifehacker Australia .

    • chevron_right

      You Can Score 35GB of Mobile Data for Just $15 Right Now

      pubsub.dcentralisedmedia.com / LifehackerAustralia · Friday, 19 February, 2021 - 05:22 · 1 minute

    Want a solid mobile data recharge for cheap? Amaysim – who are powered by the Optus 4G Plus Network – are currently offering a half-off deal on its 35GB prepaid plan.

    With this discount offer, you’ll only have to pay $15 per recharge for the first three recharges you make with Amaysim. A recharge for the 35GB Amaysim plan would normally cost $30, so with this half-off deal you can save $45 over those first three recharges.

    An Amaysim recharge lasts 28 days, so as long as you don’t hit your data cap, you can get close to three months of discounted prepaid data. And since it’s a prepaid plan, that means you won’t be locked into any contracts so you’re free to go elsewhere once the discounted recharges finish.

    This offer is available until February 28.

    How do Amaysim’s prepaid plans compare to other mobile plans?

    For $15, Amaysim’s 35GB prepaid plan is great value for money.

    Most mobile plans sit in the $35 range, and can net you between 35GB to 50GB of data. If you desperately need as much data as you can possibly get, you might be best grabbing Circles.Life’s 50GB data plan for $22 per month.

    Amaysim isn’t the only telco that has slashed 50% off of its prepaid plans. Earlier this week iiNet released a half off deal across all of its prepaid plans , which means you can score 25GB of data for only $15.

    In terms of value, that’s not as good as Amaysim’s discount – but if you’re someone who only needs a small amount of data each recharge and aren’t too keen on paying for the extra you aren’t using, iiNet’s plans are worth looking into.

    You can see how Amaysim’s prepaid offers compares with other mobile plans within the 35GB data range.

    The post You Can Score 35GB of Mobile Data for Just $15 Right Now appeared first on Lifehacker Australia .

    • chevron_right

      Use ‘Nearby Share’ to Send Android Apps to Your Friends

      pubsub.dcentralisedmedia.com / LifehackerAustralia · Thursday, 18 February, 2021 - 20:00 · 2 minutes

    As an Android user, how do you share apps with other people? You probably tell them, “Hey, I awesome downloaded [cool app name]. You should play/use it too.” But Google has introduced a new way to share apps from Google Play, and it’ll be pretty useful when (if?) we’re ever able to hang out in person again.

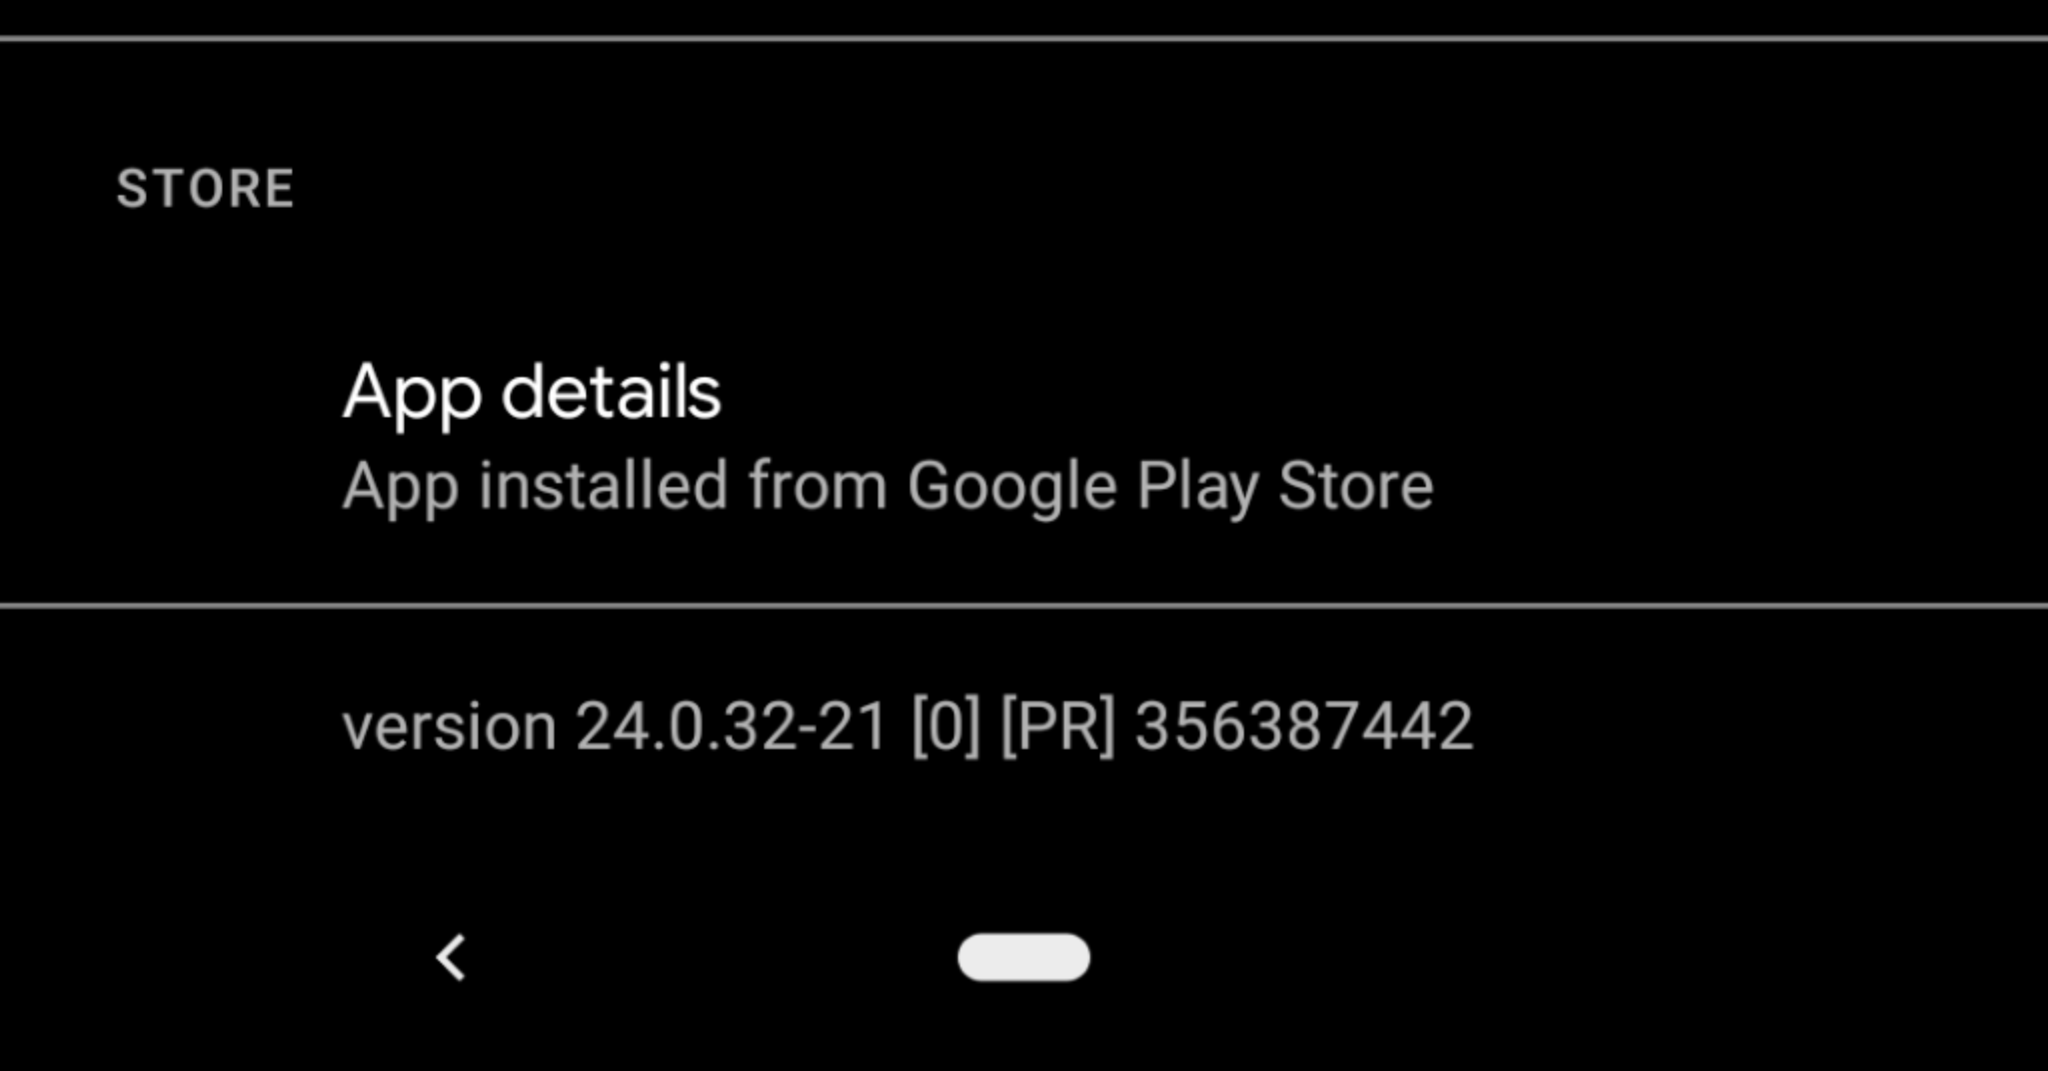
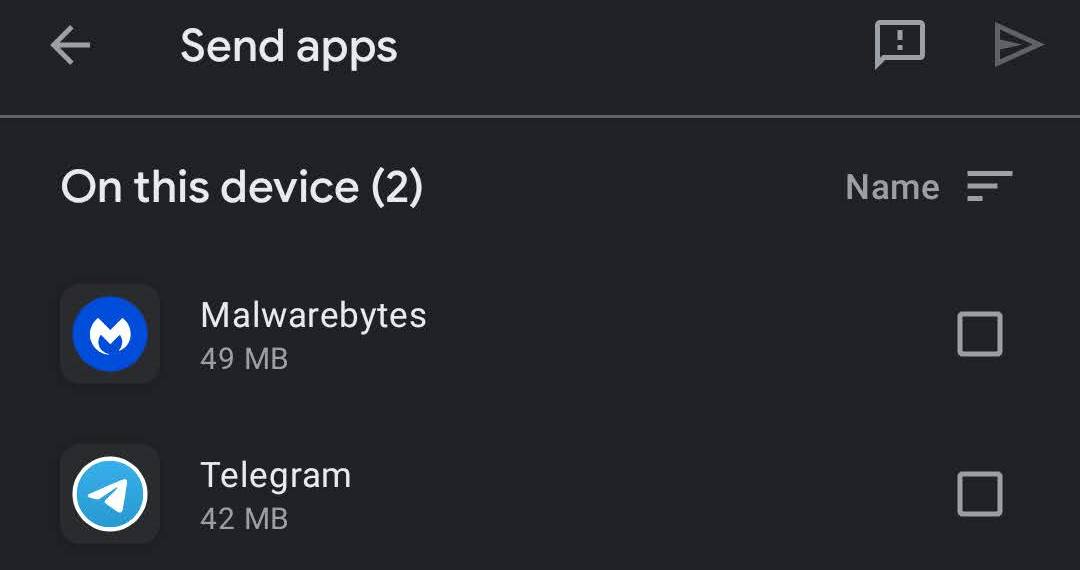
    Once you can access the feature, which is currently rolling out various permutations of devices running the 24.0 version (or newer) of the Google Play Store app, you’ll be able to send some of the apps on your phone directly to friends using your device’s Nearby Share feature. However, there’s a caveat; as Android Authority reports, not all apps are eligible for the sharing, thought that might change at some point.

    To check if you have this capability yet, make sure you’ve updated your Android’s operating system and all of its apps to the latest versions available (via Settings > System > Advanced > System Update , at least on my Pixel). Check your version of the Google Play Store app by visiting Settings > Apps & notifications > See all [x] apps > Google Play Store > Advanced , and scrolling down a bit until you see the app’s version number. (Again, those are instructions for my Pixel, so the exact path might vary for your specific Android.)

    zx1o5auzzukrct8fev03.png?auto=format&fit=fill&q=65&w=1280

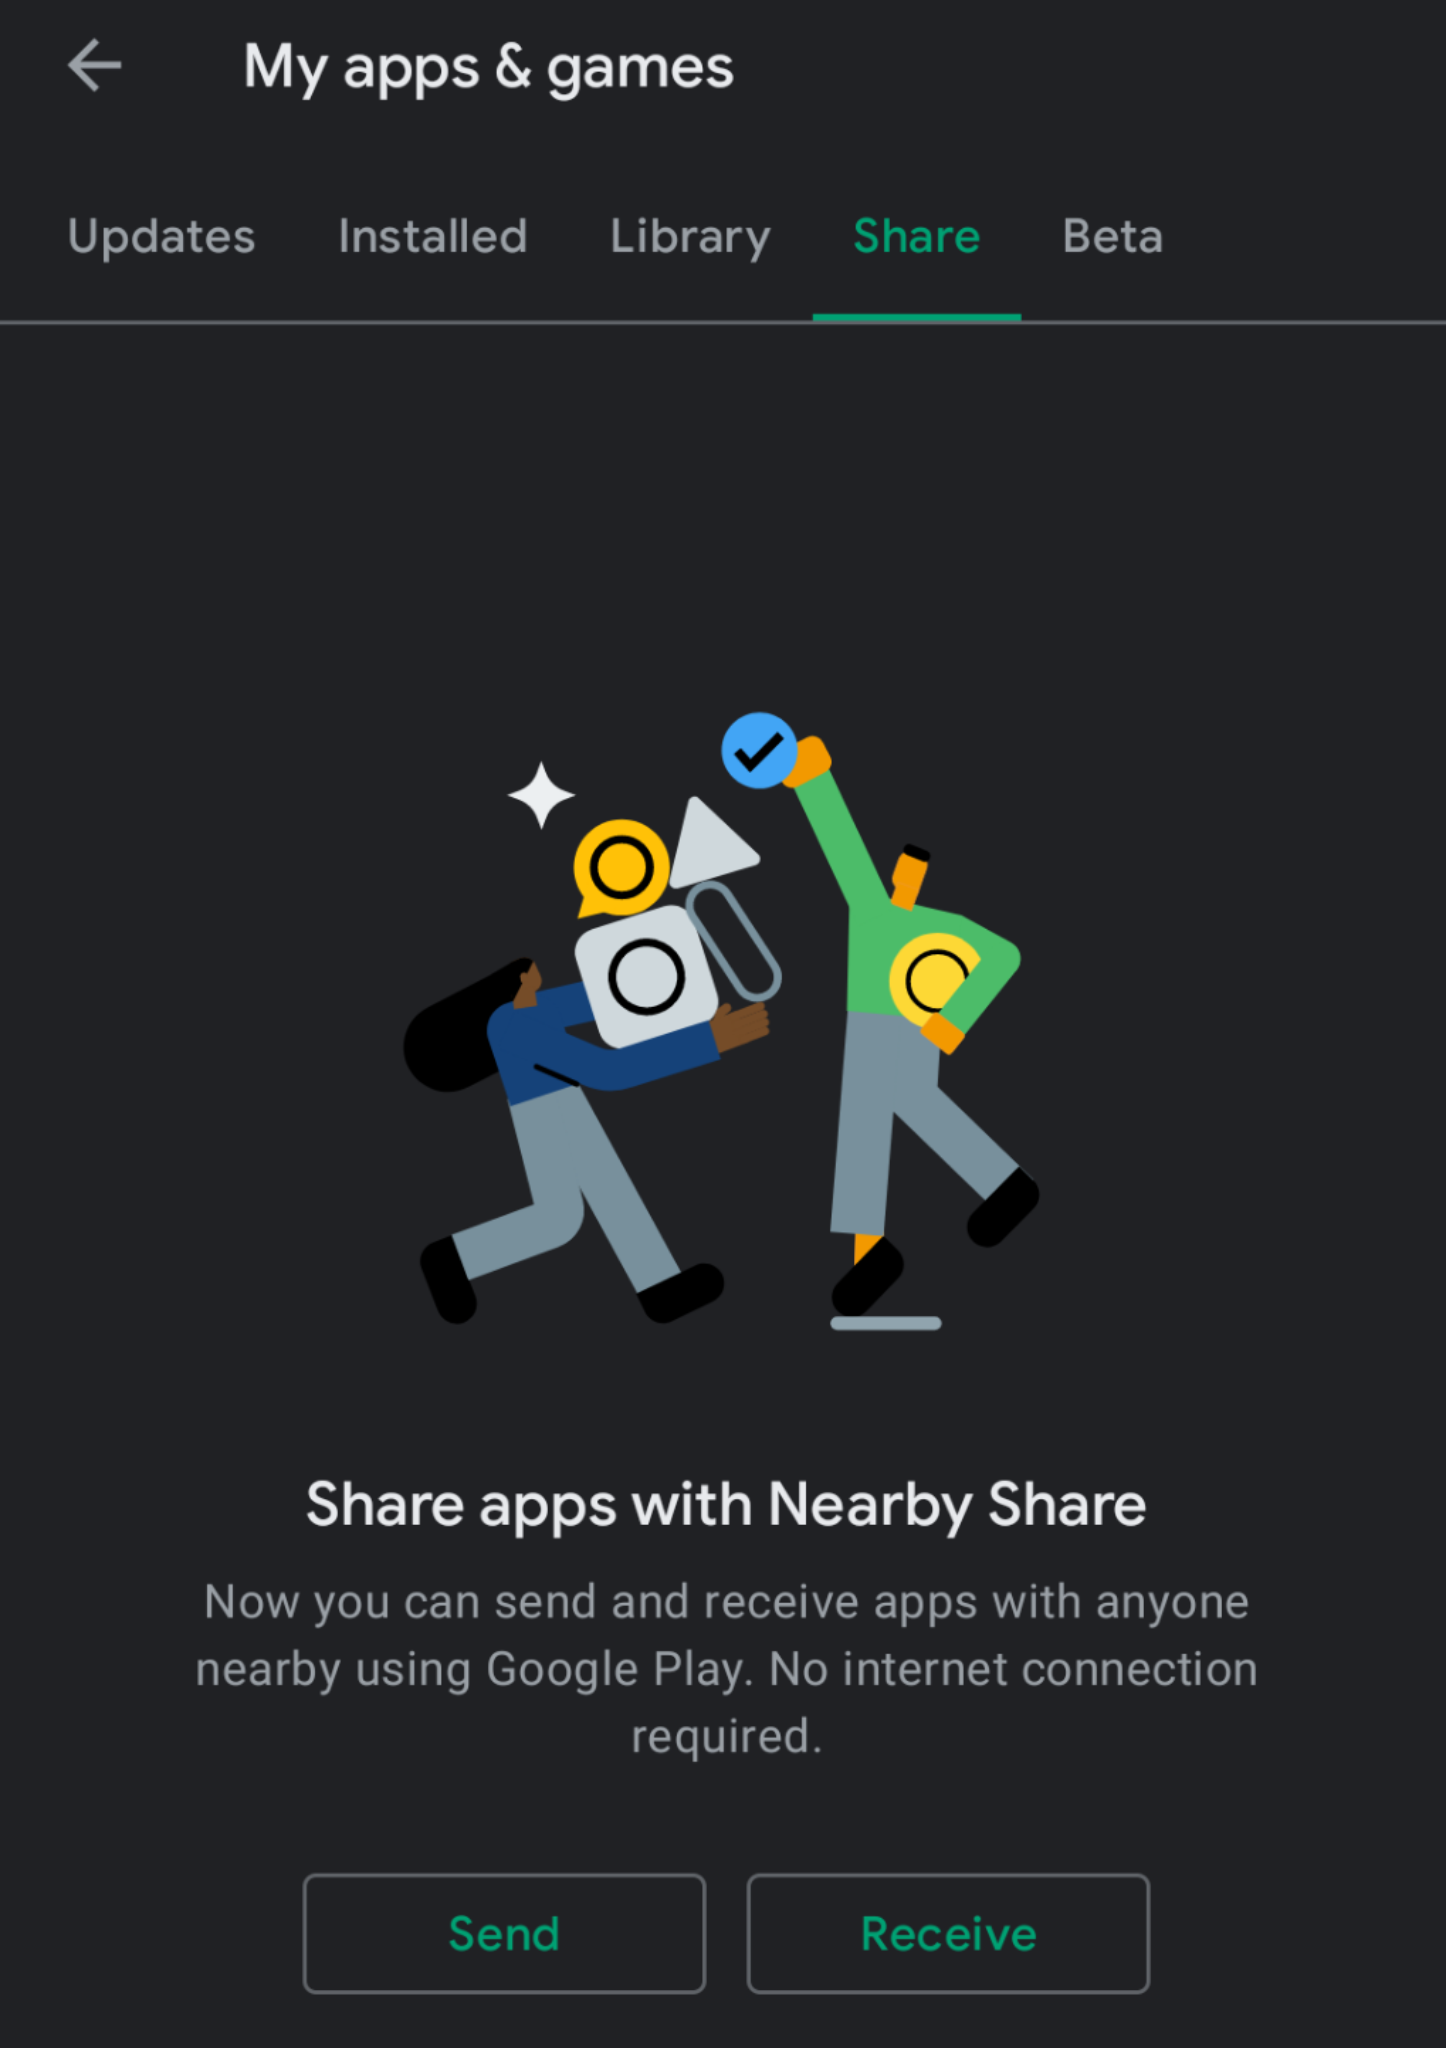
    Next, launch Google Play, tap on the three-line hamburger icon in the upper-left corner, and select My apps & games . You should now see a new tab at the top: Share . Tap it, and you’ll see this prompt:

    e8fvnm6b1u6ujwzh5kks.png?auto=format&fit=fill&q=65&w=1280

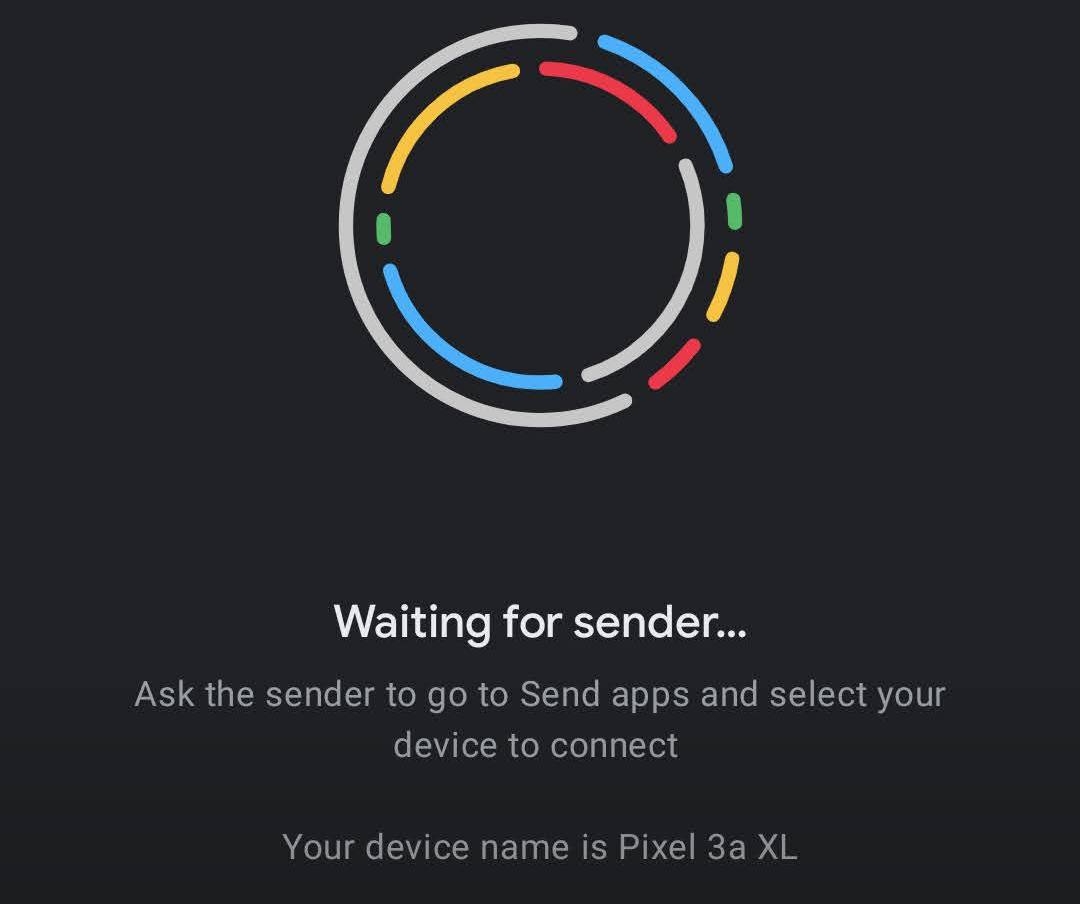
    Once you’ve given the app the proper permissions, you’ll be able to use the Send button to shoot apps to nearby phones that have tapped on the Receive button and are awaiting transmission. Neither phone needs an internet connection for this to work, as Nearby Share works via a bunch of different methods (“Bluetooth, Bluetooth Low Energy, WebRTC, or peer-to-peer WiFi “) to ship .APKs between the two devices.

    o5hqjtvvfdf1onozf3sw.jpg?auto=format&fit=fill&q=80&w=1280&nr=20
    n3xmysvsoq1uyc8f2cor.jpg?auto=format&fit=fill&q=80&w=1280&nr=20

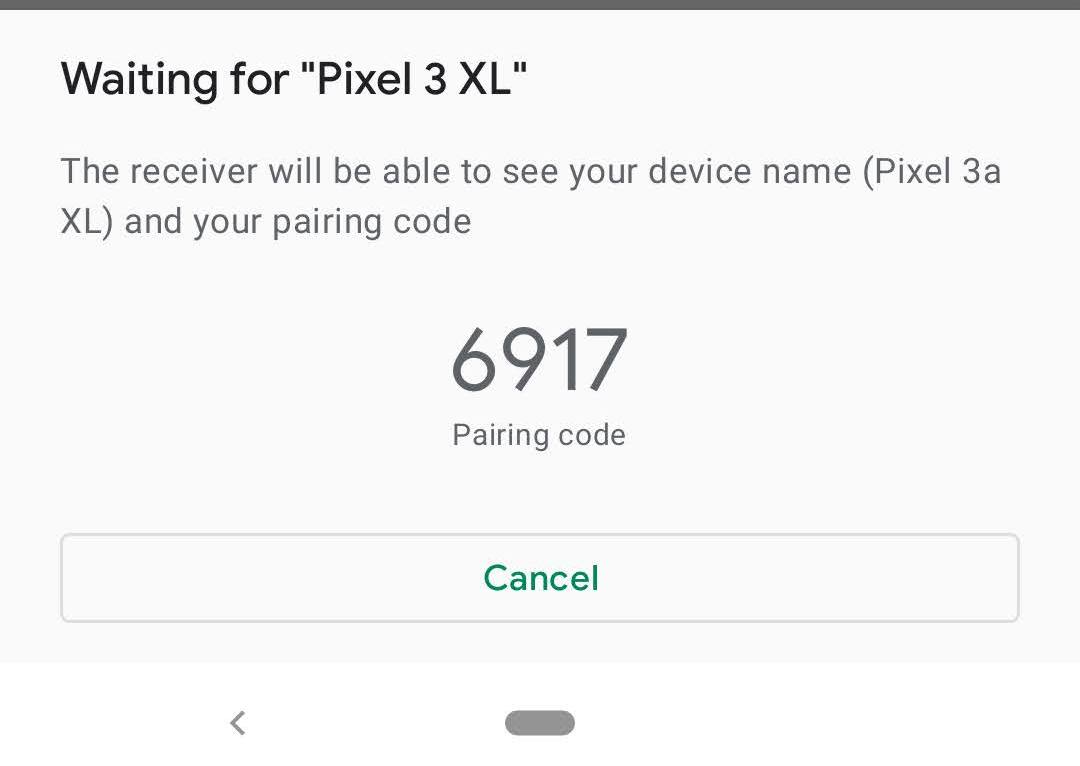
    Once you’ve picked a device to send apps to — or once someone has elected to send one to you — you’ll get a prompt with a pairing code. All you have to do is make sure the four-digit codes match on the sending and receiving devices. Odds are they will, unless someone else near you is trying to do the exact same thing at the exact same time.

    yqcsfft4fpx0efmvzszn.jpg?auto=format&fit=fill&q=80&w=1280&nr=20

    The post Use ‘Nearby Share’ to Send Android Apps to Your Friends appeared first on Lifehacker Australia .

    • chevron_right

      How to Ditch WhatsApp for Good

      pubsub.dcentralisedmedia.com / LifehackerAustralia · Sunday, 14 February, 2021 - 21:29 · 1 minute

    If you use WhatsApp, the incredibly popular messaging app owned by Facebook, chances are you’ve encountered the news surrounding their ever-changing privacy policy. While the service seems to continually shift from more to secure to less secure and back again, you may feel like it’s time to pack up your data and find a new platform to chat with friends.

    If you choose to remove yourself from WhatsApp, here’s what you’ll want to do:

    To export your messages, tap on the chat you want to save. Tap on the name of the chat at the top and scroll down to “Export Chat,” and then choose whether or not you want to include the media from the chat with it.

    Then request your account data by going to “Settings” in the bottom right corner. Then choose “Account” and “Request Account Info”. It will take about three days to receive your data report from WhatsApp, but they’ll notify you when it’s ready.

    For Better Privacy, Use These Apps Instead of WhatsApp’s Disappearing Messages

    WhatsApp’s long-awaited disappearing messages feature has finally rolled out for all users, but you should make sure you’re comfortable with how the feature works before using it.

    Read more

    Finally, to delete your account, go to “Settings,” then “Account,” and “Delete My Account”. Doing so will erase your message history, remove you from all groups, and delete your backup. Now you’re free and clear of WhatsApp, and just need to convince your friends and family to migrate to a different app.

    The post How to Ditch WhatsApp for Good appeared first on Lifehacker Australia .

    • chevron_right

      How to Take Scrollable, Full-Page Screenshots of Websites on iOS

      pubsub.dcentralisedmedia.com / LifehackerAustralia · Thursday, 11 February, 2021 - 18:45 · 2 minutes

    Once a year or so, I spend some time trying to find the best way to take a seamless screenshot of an entire website, as I’m not always a fan of the CTRL + S approach for saving a site’s data. I only wish I knew earlier how absurdly easy this was to do on iOS, of all places.

    I’ve tried plenty of browser extensions that worked to varying degrees (until I found the reason why most of them would typically mess up for me). Capturing the entirety of a site on my iPhone now opens up plenty of new possibilities though — including being particularly convenient if I want to send someone a snapshot of what a site looks like at the exact moment I’m viewing it or want to show someone how a bug is mucking up my experience.

    How To Fix Full-Page Browser Screenshots That Render Black

    There are a bunch of different extensions you can use to take full-page screenshots in your browser — typically a more elegant way to preserve a site’s contents than “printing” it as a PDF or saving it to your computer as a complete website. Since I use Chrome, Full Page Screen Capture...

    Read more

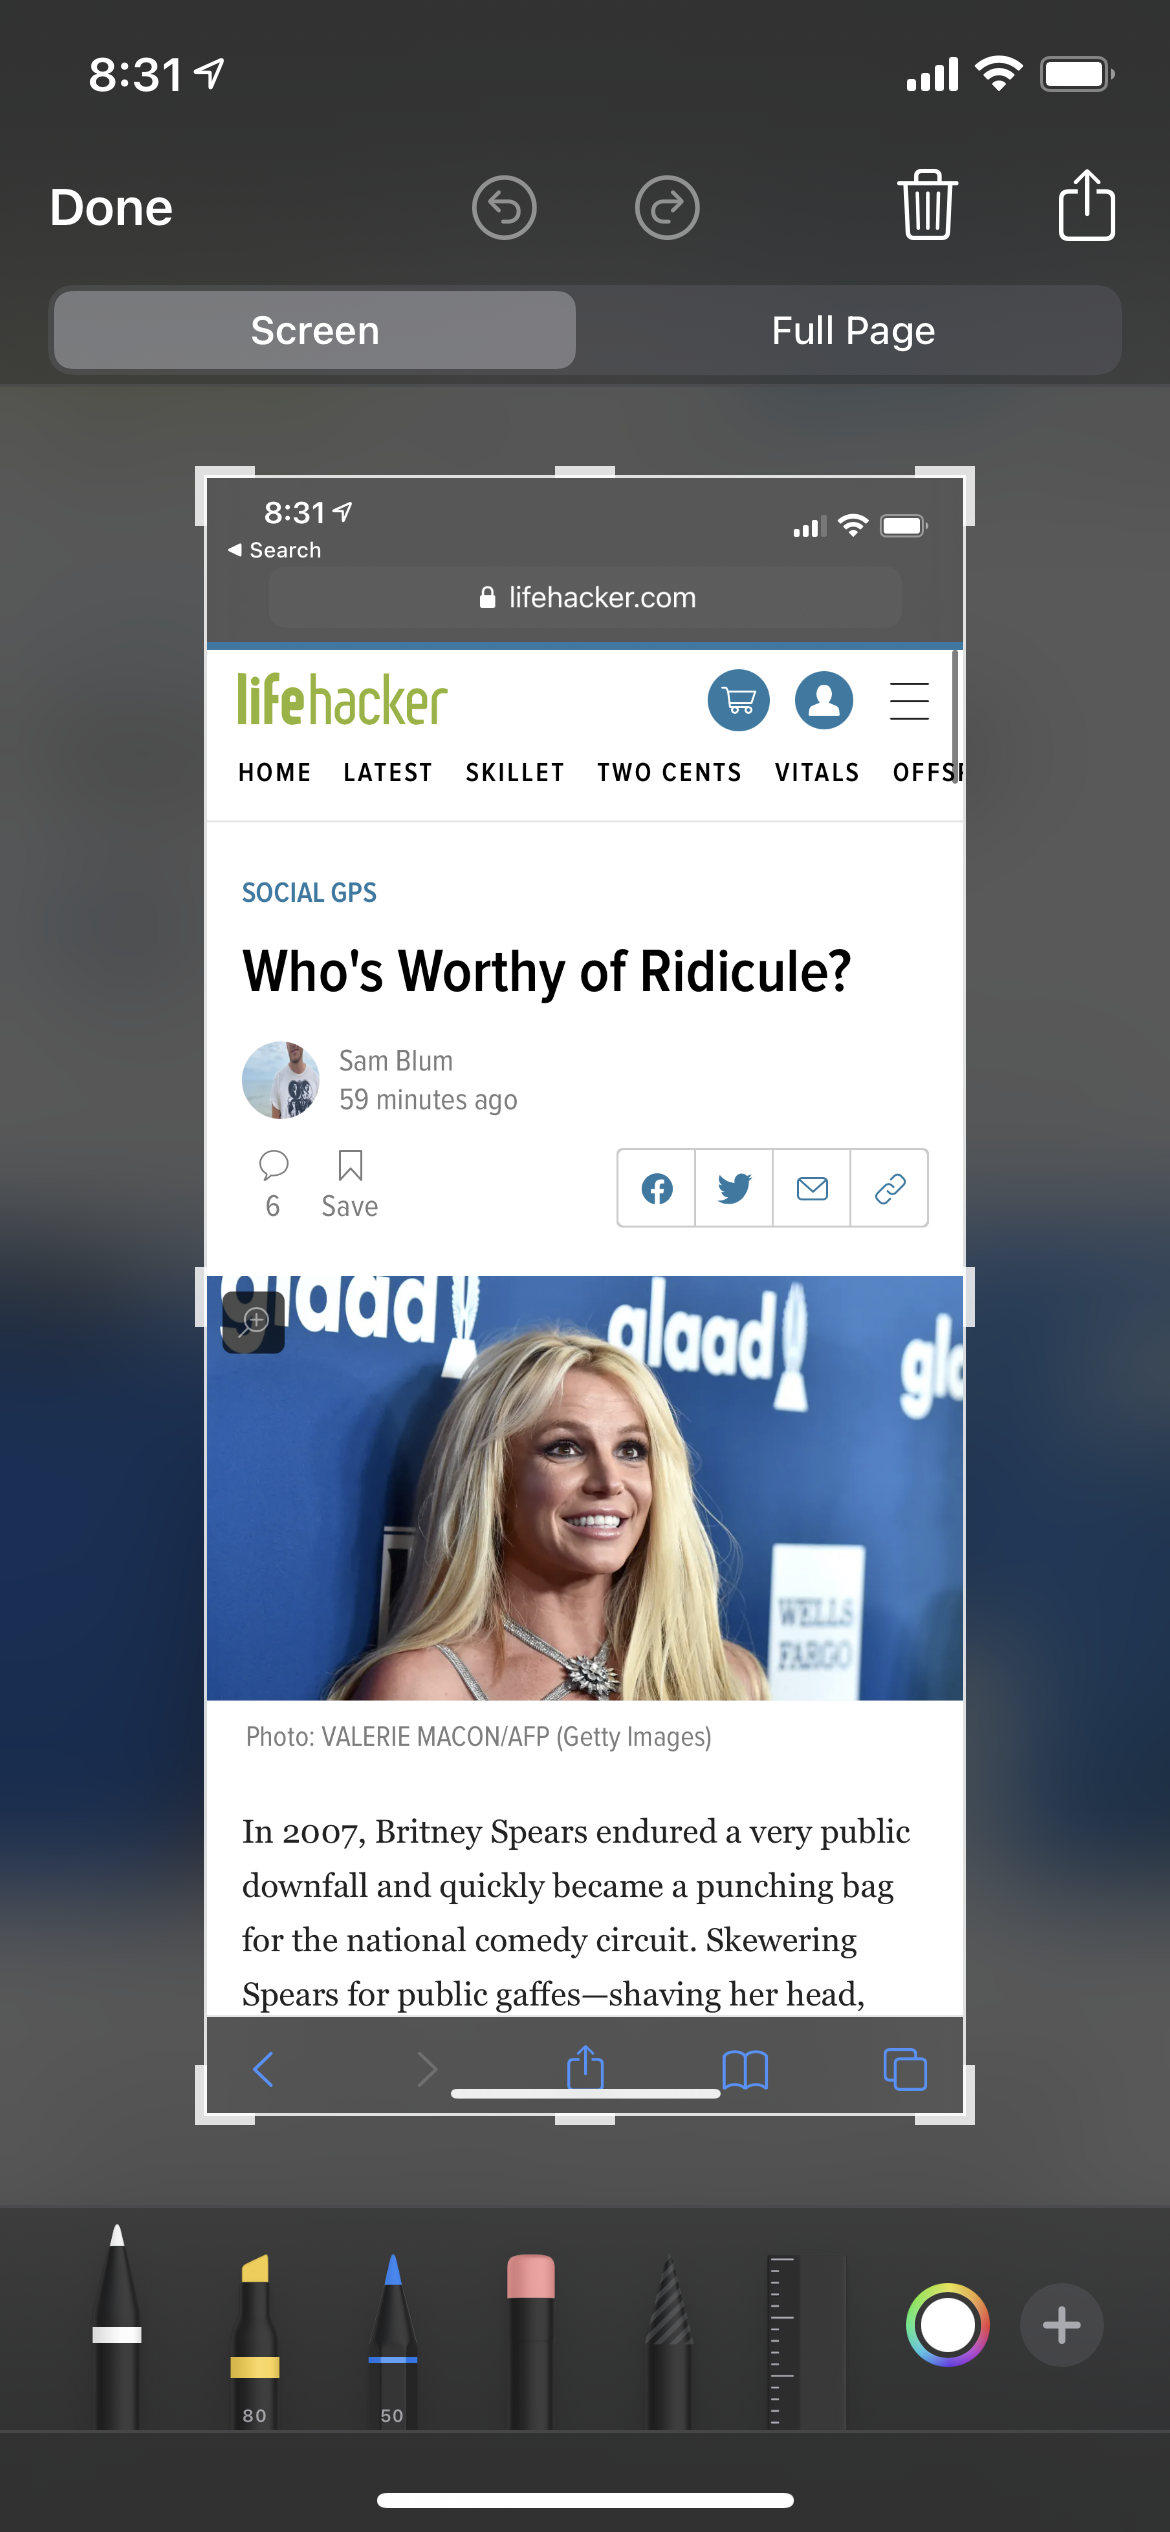
    Whatever the reason, capturing a full-page screenshot of a website on iOS is simple. To start, launch the website in your device’s Safari browser — after you’ve made sure you’re using the latest version of iOS. Take a screenshot of a website as you normally would — Side Button + Volume Up , in my case. You’ll now see this screen:

    vepbqjrmswvylva3nh9c.png?auto=format&fit=fill&q=80&w=1280&nr=20

    If you don’t see those two options at the top — Screen and Full Page — iOS is probably being fussy. Close Safari, reopen it, and try taking another screenshot. These options are critical, as tapping Full Page is the magic sauce that will lead you to this screen:

    mehgkw3upcs5p8hc6lds.png?auto=format&fit=fill&q=80&w=1280&nr=20

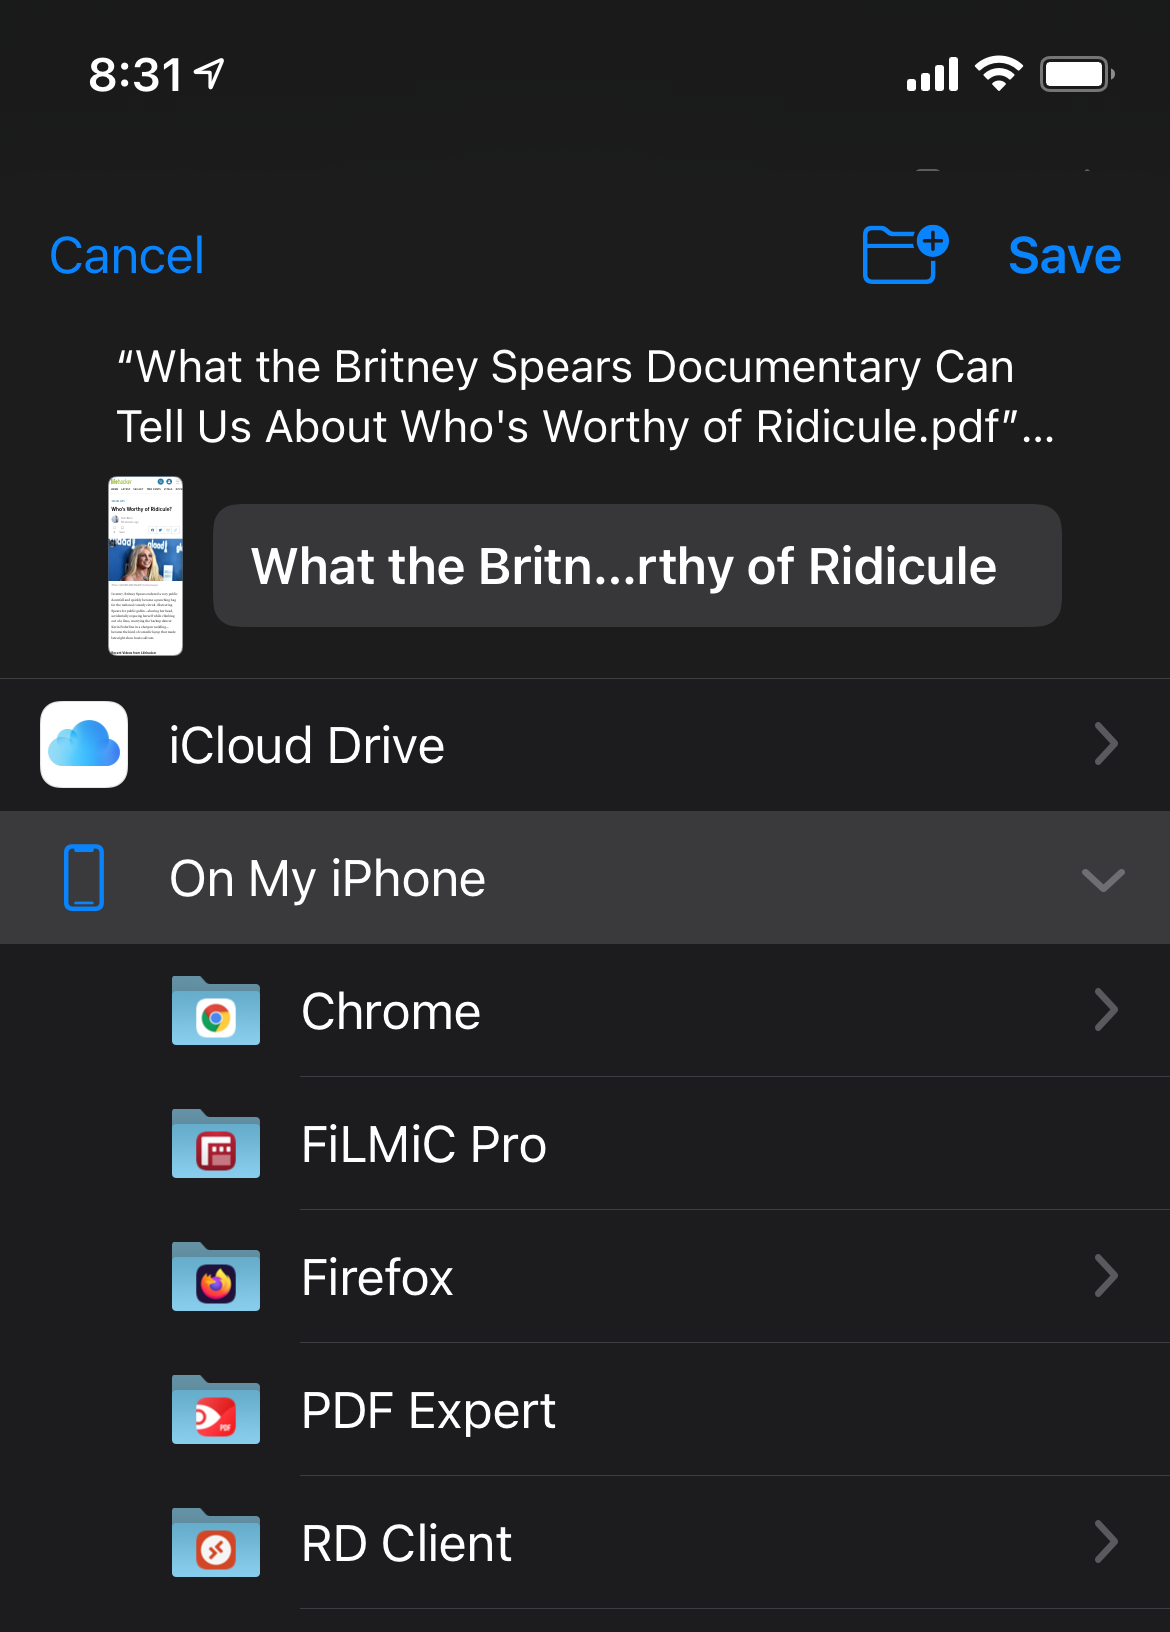
    That little sidebar on the right, which you can scroll through up and down, shows you the entirety of the page that your phone has captured. When you go to save it, however, you won’t be dropping it in your photo album because your device isn’t technically creating a giant photograph. Instead, your iPhone will have converted this mega-screenshot into a PDF, so you’ll need to send it to some other folder on your device:

    d9hoyi8zyhgwctpsyo0d.png?auto=format&fit=fill&q=80&w=1280&nr=20

    And that’s it. You now have a gigantic, full-page screenshot of whatever website you were looking at — one that’s already been converted into a PDF for you. If you’re doing a lot of archiving of old work, I would argue this is almost easier to deal with than the combination of a desktop browser and an extension, but that’s just me.

    The post How to Take Scrollable, Full-Page Screenshots of Websites on iOS appeared first on Lifehacker Australia .

    • chevron_right

      How to Handle Your Kid’s Fear of Shots

      pubsub.dcentralisedmedia.com / LifehackerAustralia · Wednesday, 10 February, 2021 - 21:15 · 4 minutes

    There is no timeline yet for when a coronavirus vaccine will be deemed safe and available for kids under age 16. However, you should still be keeping them up with their regular wellness checks and immunisation schedules, even as we continue to work our way through this pandemic.

    For some kids (and adults), even the thought of that needle can send them into a panic. They’re probably never going to love getting a shot, but you can help reduce some of their anxiety with a little preparation.

    Prepare them

    Springing a shot on a child, once they’re old enough to know what one is and they have shown some anxiety over it, is usually not a good idea. I didn’t offer up the information when my son was very little and largely unaware of what was happening; but by the time he was old enough to ask whether he was going to get a shot, I answered honestly.

    It’s important to explain to kids in basic language why the shot is important (“It prevents you from getting certain diseases that could make you very sick”), acknowledge any anxiety they have about it (“It sounds like you’re feeling a little nervous; I’ll be right there with you the whole time”), and be honest about what they’ll experience. A shot does feel painful to some people, even if it’s just for a moment; to say they “won’t feel a thing” isn’t necessarily true and may make them feel like you lied to them. Instead, focus on the briefness of the discomfort: “It only hurts for a second, like a small pinch, and then it’s done.”

    You may want to choose a relaxation technique or breathing exercise that you can do together when it’s time for them to receive the shot, such as counting down from three, singing a favourite song, or doing some deep breathing together. Don’t forget to vocalise whatever relaxation technique you’ve practiced to the doctor or nurse before they get ready to administer the shot. If you don’t, the doctor may give your child directions that are contrary to what you’ve practiced, which may be confusing for them.

    It’s also worth noting that if they’re not displaying any worry over getting a shot, there’s no need for the extensive prep — that will only make them think maybe they do have something to worry about. Follow their lead on this.

    How to Find a Paediatrician You Like

    Finding a paediatrician you trust — and who is reliable, accessible and conveniently located — is no easy feat. I know this because I am currently attempting to do so for the third time in the 10 years since my son was born. Over that decade, I found two doctors...

    Read more

    Give them some control

    Getting a vaccination can be anxiety-inducing, even for adults. And the central part of the experience — whether or not to actually get the shot — is not in their control. But there are lots of other choices you can let them make to help them feel like they’re directing the action, rather than have the action happen to them against their will. To start, before you leave home, ask them if there is a comfort item, such as a stuffed animal or favourite blanket, they’d like to bring with them to squeeze or provide a distraction.

    When you go into the exam room, let them choose to sit in your lap or on their own. They can choose which arm gets the shot, and which Band-Aid will cover it up. (If you’re not sure whether their doctor will have a selection of Band-Aids, you could bring one from home and they can choose between yours and the doctor’s.) If you’re both getting a flu shot, ask if they’d like to watch you go first, and they can help you be brave. I’m not suggesting you flood them with an overwhelming number of choices, but letting them have a say in a couple of these things can ease a feeling of helplessness.

    But perhaps most importantly: Remain calm yourself throughout the entire process. It can be heartbreaking to watch your child experience fear or pain, but they will feed, at least partially, off your own emotions. If you seem anxious, it is likely to make them even more nervous. Be encouraging throughout the experience and praise them afterward for being brave.

    End with some kind of treat

    There are different views on whether rewarding a child with treats is ever ok or always a terrible idea. I personally fall into the “I won’t bribe you to behave , but I will celebrate your bravery after you’ve done a hard thing” camp — and it takes bravery to get a shot when you’re scared of that needle.

    Not all treats have to come with a cheap plastic toy or be covered in sprinkles. You could promise you’ll cue up their favourite movie when you get home or play their favourite game after dinner. Maybe you’ll swing by the playground after their appointment or you’ll add bubbles to their evening bath. You can focus your “treat” either on something they love to do or something that will comfort them.

    The post How to Handle Your Kid’s Fear of Shots appeared first on Lifehacker Australia .

    • chevron_right

      How to Ward Off Spoilers on Twitter

      pubsub.dcentralisedmedia.com / LifehackerAustralia · Tuesday, 9 February, 2021 - 20:44 · 1 minute

    Hearing that there’s been some kind of eye-opening twist on WandaVision might make you anxious about logging into any kind of social media. We’ve already talked about a number of techniques you can use to avoid spoilers on social media , but here’s a new one to add to the mix: Hide Twitter Trends .

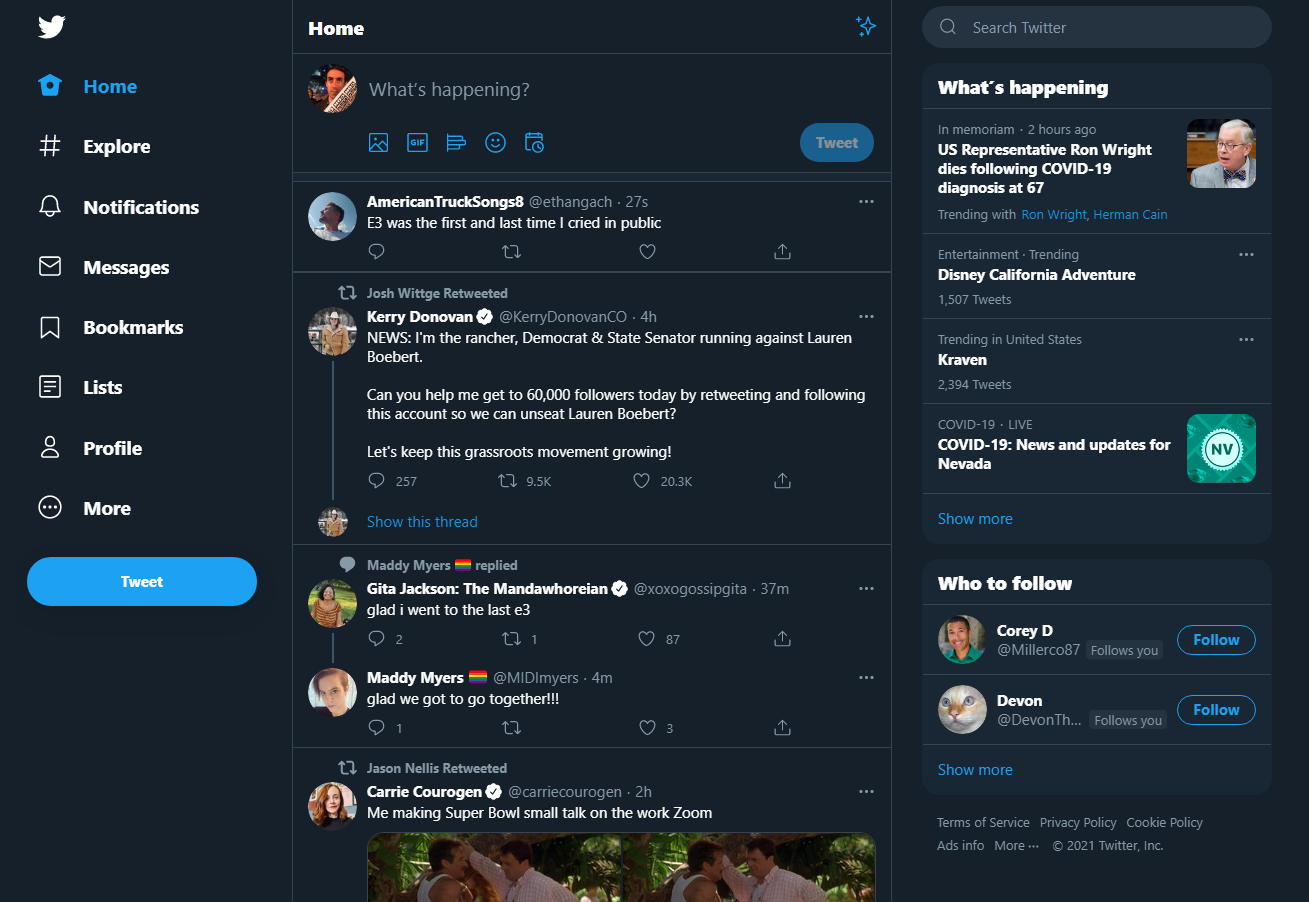
    This aptly named Chrome extension does exactly what it suggests. Install it, and your Twitter home page will go from this:

    yuwdtnovxfsqg8srzqye.png?auto=format&fit=fill&q=65&w=1280

    To this:

    ebtxaswzngz3vjegsuju.png?auto=format&fit=fill&q=65&w=1280

    That’s quite a purge of information — basically everything on the right-hand side of Twitter’s UI. However, it’ll help ensure that your Twitter UI stays as spoiler-free as possible, though it won’t do anything about your actual feed. For that, make sure you continue using our advice of muting keywords related to content that you don’t want to see. You can set these blocks permanently or for, say, 30 days from the current date, with the hopes that internet chatter about whatever spoiler-filled topic you’re concerned about dies down by then.

    While Twitter Trends are generally pretty dull, I wouldn’t assume that you’ll be safe from spoilers by simply not looking at them. There have been instances where key moments in media are ruined by Twitter’s “helpful” feature though:

    So, unfortunately, you’re going to want to mute keywords and have a browser extension installed — and, even then, hope that someone doesn’t fumble-fingers that “Dorth” Vader is Luke’s father. And, of course, if your media matters that much to you, perhaps staying off Twitter around key moments is for the best.

    The post How to Ward Off Spoilers on Twitter appeared first on Lifehacker Australia .

    • chevron_right

      What to Do When YouTube Stops Working on Your Old Apple TV

      pubsub.dcentralisedmedia.com / LifehackerAustralia · Friday, 5 February, 2021 - 20:15 · 2 minutes

    According to a notification from Apple, YouTube is dropping support for some Apple TVs in early March. Users can still watch videos from a secondary Apple device via AirPlay, but you won’t be able to use the YouTube channel itself on third-generation Apple TVs from 2012.

    Newer Apple TV devices, like the Apple TV HD and Apple TV 4K, will still support YouTube. These models run tvOS, which is a modified version of iOS. That means they can run many of the same media apps that an iPhone can. Older Apple TVs, however, used proprietary “channels” that had to be made specifically for these models. YouTube already pulled support for the first and second-generation Apple TVs, so it was only a matter of time before gen three got nixed, too.

    We’d love to offer a workaround for those affected, but so far we haven’t seen one. That leaves owners of older Apple TVs with two options for watching YouTube on their TVs. The first is using AirPlay to watch YouTube. Watching over AirPlay is a minor extra step, but an extra step nonetheless. And you’ll need a compatible iPad or iPhone to cast from.

    The other option is even less great: Switch to a different device when you want to watch YouTube. It’s possible you already own a viable alternative, such as a smart TV or a gaming console like the PlayStation 4 and 5, or the Xbox One, Series X, or Series S.

    Besides, it’s probably time to upgrade that ancient Apple TV. And if you do, you have several options. The best upgrade for existing Apple TV users is the latest Apple TV HD or Apple TV 4K. The Apple TV 4K is the more powerful option, but the Apple TV HD is still a great choice for those without a 4K TV. Either will feel like a major upgrade if you’re moving on from an older Apple TV box.

    If the new Apple TVs are too expensive, you could jump over to Amazon’s Fire TV stick or a Roku. The good news is that you can get the Apple TV app on either, which means you’ll still be able to watch all of your Apple-purchased content (or subscriptions) without paying for a more-expensive Apple TV set-top box.

    The post What to Do When YouTube Stops Working on Your Old Apple TV appeared first on Lifehacker Australia .

    • chevron_right

      How To Unlock the Best Features on Your iPhone

      pubsub.dcentralisedmedia.com / LifehackerAustralia · Friday, 5 February, 2021 - 06:17 · 3 minutes

    We’ve covered a ton of iPhone and iPad features in the past , but these options are easy to overlook if you’re not used to browsing through the right sections of your iPhone or iPad’s Settings (or even just using certain buttons). And you should take some time to learn what’s available, as there are plenty of useful tools that Apple has snuck in there, and they’re great for increasing productivity.

    Among our favourite iPhone hacks:

    There are two features other we want to describe in a little more detail: magnification and voice controls. The former is a great way to get a closer look at anything your phone’s camera can see, and the latter is an incredibly useful way to control your iPhone or iPad with your voice.

    Use Your iPhone/iPad as a magnifying glass

    wyyclx0lp8upsgiitxbn.png

    The Magnifier tool uses your device’s camera to zoom in on real-world objects.

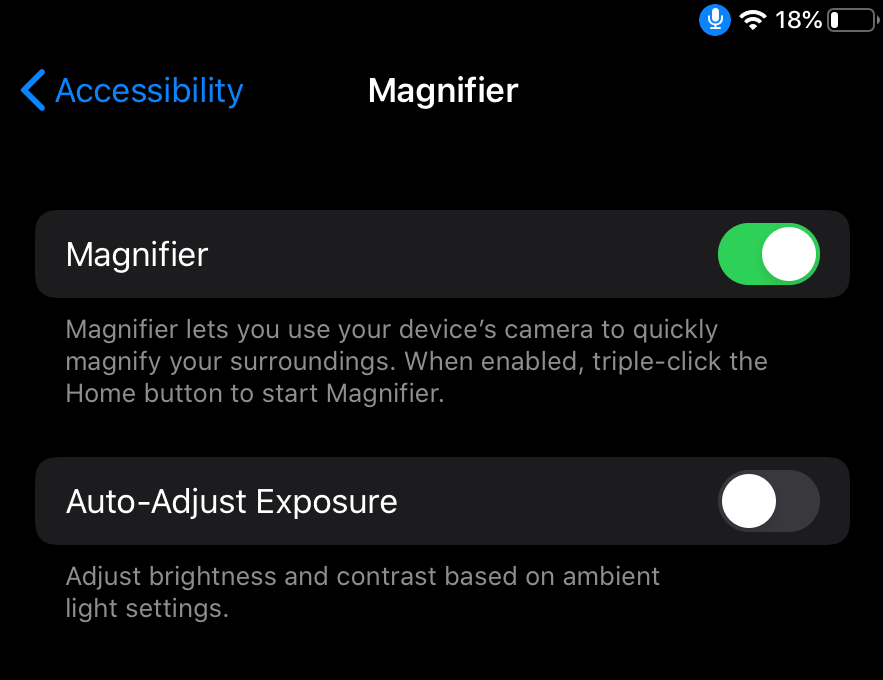
    1. To use it, go to Settings > Accessibility > Magnifier.
    2. Tap the “Magnifier” toggle on.
    3. Triple-press the home button to open the Magnify camera. You can zoom in and out using the slider, and snap a photo with the shutter button.

    I was surprised at just how close the camera lets you zoom-in, though the quality of the zoomed-in image will differ between devices. If you find your zoomed image is too bright, try turning on the “Auto-Adjust Exposure” option in the Magnifier menu to help reduce glare. (Note that Magnifier is different from the Zoom feature listed above; that one gives you a closer look at whatever apps or photos are currently displayed on your screen.)

    Use Siri to manage your iPhone or iPad via “Voice Control”

    gi86ewwvoclssutw8os8.png
    1. Go to Settings > Accessibility > Voice Control
    2. Tap “Set Up Voice Control” then tap “continue.” You’ll be shown a list of Siri commands that can be used to control your device.
    3. Tap “Done” to close the instructions.
    4. Tap the “Voice Control” toggle the feature on.

    You can now use any of the commands listed in the instructional guide to control your device (and you can find the list again by tapping “Learn More…” under the “Voice Control” toggle).

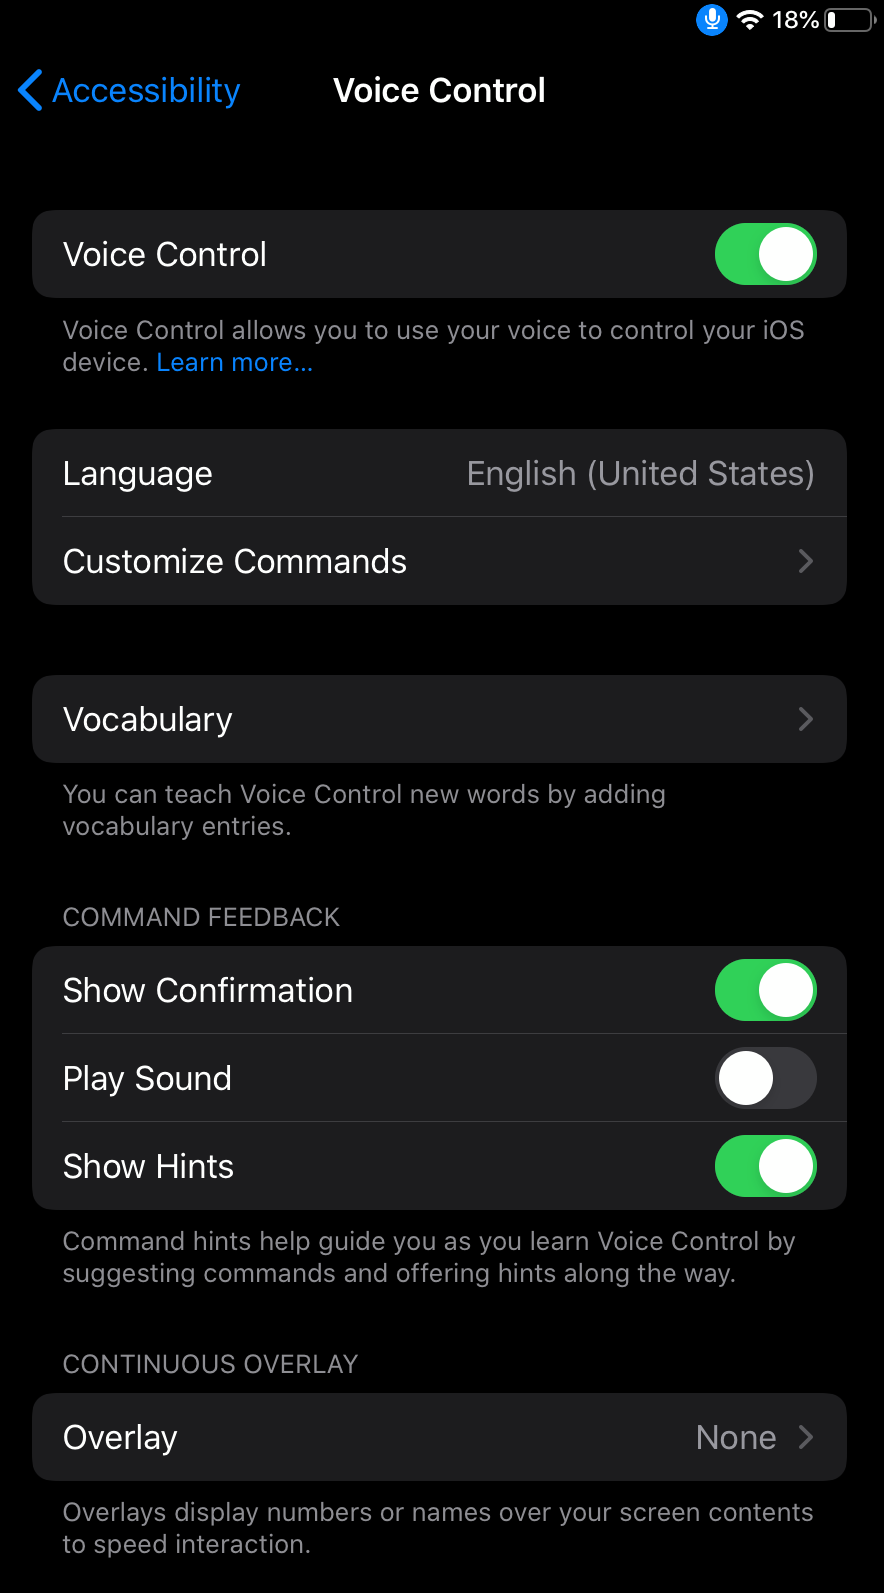
    You can also customise your commands, onscreen feedback and interface setup in Settings > Accessibility > Voice Control . Here’s what each option does:

    • Language: Set your preferred language for controlling Siri (defaults to your system’s preferences).
    • Customise commands: Create and edit new voice commands.
    • Vocabulary: Lets you teach Siri new words that can be used to create commands. This can help make your commands feel more natural.
    • Show confirmation: Turns on visual feedback when a command is heard by Siri.
    • Play sound: Enables audio confirmation when Siri hears your commands.
    • Show hints: Offers real-time tips based on how you use Siri commands, and suggests commands to use.
    • Overlay: Turn this on to give each on-screen element a number value, .which can then be used in your voice commands to specify buttons or parts of the screen you wish to access.

    This article has been updated since its original publish date.

    The post How To Unlock the Best Features on Your iPhone appeared first on Lifehacker Australia .