• On chevron_right

      How to use the EZP2023+ USB Programmer

      pubsub.slavino.sk / onetransistor · Tuesday, 26 December - 12:51 edit · 1 minute

    Previously I analyzed the hardware of EZP2023+ USB Programmer to find it is a rather simple device, based on CH552G microcontroller which allows for SPI, I2C and MicroWire capabilities. If you didn't know this is a serial memory programmer, which can be used to read and write a variety of memory chips, including EEPROMs and BIOS ICs commonly found in computers and other electronic devices. After I traced the schematic, I realized EZP2023+ also comes with mixed voltage levels (meaning it powers the memory to program with 3.3 V while the data bus uses 5 V for I/O) and this is a big issue since it can destroy whatever you are trying to read or program.

    In this post I will share my experience with the programmer and discover some flaws of its programming software. You should get the programming utility on a CD which is in the product box. Since recent computers and notebooks no longer have an optical drive, this is already an issue. Getting past that, on the CD you will find the user manual and accompanying software, with driver. Let's see how you get everything ready to program memory chips.

    How to use EZP2023+ USB Programmer

    Read more

    Značky: #Elektro, #Programmer, #Electronics, #EZP2023, #SPI, #I2C

    • On chevron_right

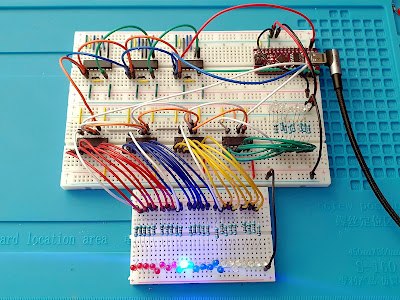
      Daisy chaining and bus sharing with shift registers

      pubsub.slavino.sk / onetransistor · Sunday, 2 April, 2023 - 12:18 edit

    A shift register is a digital circuit that is used to store and manipulate data in a sequential manner. It is composed of a series of flip-flops, which can be viewed as basic memory units able to store binary values. The outputs of each flip-flop are connected to the inputs of the next flip-flop in the sequence, such that the data is shifted from one flip-flop to the next with each clock pulse.

    In this post I will use the 74HC595 serial-in-parallel-out shift register and its counterpart, 74HC165 parallel-in-serial-out shift register. Both are commonly employed when a microcontroller with limited available I/O pins has to control a large number of digital outputs or read a similar number of inputs (for example in home automation). What I want to show you in this post is how to daisy chain these ICs and how to make them share some control lines in order to keep the serial interface data lines to a minimum.

    Shift registers circuit on breadboard
    Shift registers circuit on breadboard

    Read more

    Značky: #Digital, #74HC595, #74HC165, #Elektro, #Electronics

    • chevron_right

      Kombucha electronics? Sure, why not?

      news.movim.eu / ArsTechnica · Wednesday, 22 February, 2023 - 20:58 · 1 minute

    Brewing kombucha tea. Note the trademark gel-like layer of SCOBY (symbiotic culture of bacteria and yeast).

    Enlarge / Brewing kombucha tea. Note the trademark gel-like layer of SCOBY (symbiotic culture of bacteria and yeast). (credit: Olga Pankova/Getty Images)

    Cheap, light, flexible, yet robust circuit boards are critical for wearable electronics, among other applications. In the future, those electronics might be printed on flexible circuits made out of bacterial cultures used to make the popular fermented black tea drink called kombucha, according to a recent paper posted to the arXiv preprint server.

    As we've reported previously , making kombucha merely requires combining tea and sugar with a kombucha culture known as a SCOBY (symbiotic culture of bacteria and yeast), aka the "mother"—also known as a tea mushroom, tea fungus, or a Manchurian mushroom. It's akin to a sourdough starter. A SCOBY is a firm, gel-like collection of cellulose fiber (biofilm), courtesy of the active bacteria in the culture creating the perfect breeding ground for the yeast and bacteria to flourish. Dissolve the sugar in non-chlorinated boiling water, then steep some tea leaves of your choice in the hot sugar-water before discarding them.

    Once the tea cools, add the SCOBY and pour the whole thing into a sterilized beaker or jar. Then cover the beaker or jar with a paper towel or cheesecloth to keep out insects, let it sit for two to three weeks, and voila! You've got your own home-brewed kombucha. A new "daughter" SCOBY will be floating right at the top of the liquid (technically known in this form as a pellicle).

    Read 6 remaining paragraphs | Comments

    • On chevron_right

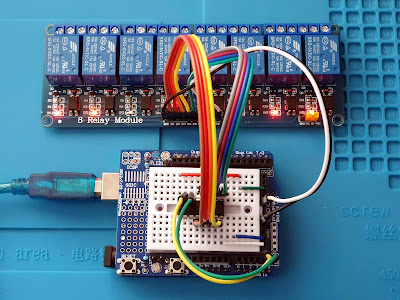
      Drive 8-Channel Relay Module with Bus Expander

      pubsub.slavino.sk / onetransistor · Sunday, 12 February, 2023 - 15:54 edit

    In automation projects it is often needed to drive multiple outputs. Combine this with the reduced number of pins of a microcontroller, such as ESP8266, and you got a problem. In this post we'll explore the methods of converting the parallel inputs of a relay module to some kind of serial protocol, which allows connecting even more relays, without the need of additional control pins. I will use for exemplification an 8-channel relay module, however the methods I will show will allow you to connect more than 8 relays to the same bus.

    To achieve this purpose, I have to use some kind of bus expander IC. There are a few available options here. However, as we will see, both communication protocol and output port capability are different. And even the common relay modules use a rather unusual method of turning on the relay driver transistor. I already discussed the difference between current sink and current source in the previous post . Let's use that knowledge.

    8 Relay module with PCF8574 bus expander
    8 Relay module with PCF8574 bus expander
    Read more

    Značky: #Electronics, #Relay, #PCF8574, #74HC595, #Elektro

    • On chevron_right

      I/O Interfacing with current source and sink pins

      pubsub.slavino.sk / onetransistor · Saturday, 4 February, 2023 - 20:24 edit

    Current source and current sink are two commonly used terms that you will find in datasheets of microcontrollers and digital circuits. Even though most input pins of an IC nowadays are internally connected to the gate of MOSFET transistors which are voltage driven, there are situations when you have to take into account current capabilities (i.e. high speed switching or something else than a CMOS input is connected to an output pin). I'm thinking about LEDs and bipolar transistor driven devices, such as relay modules.

    These inputs are current driven and need to source or sink currents to change state. Fortunately, most output pins of contemporary microcontrollers are push-pull type and can source and sink currents. This means you don't have to worry too much about the way you are connecting an LED to a digital output. But there are still in use circuits which can only sink or source currents. And if you're not paying attention to datasheet, you might very well fail to design a working circuit.

    I/O Interfacing with current source and sink pins

    Read more

    Značky: #Digital, #Electronics, #MOSFET, #Transistor, #Elektro

    • On chevron_right

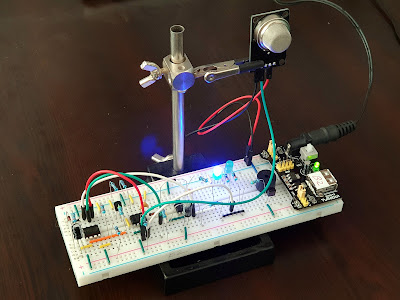
      Gas detector based on MQ-2 without microcontroller

      pubsub.slavino.sk / onetransistor · Saturday, 28 January, 2023 - 19:37 edit

    Nowadays people are using microcontrollers even for blinking an LED. And that is no problem, since they are cheap enough, have low power consumption and are easy to program. But there was a time when microcontrollers were expensive and hard to find. And even then, engineers were building working devices, just smart enough to do the job they were designed for. Let's try to build a "microcontroller-less" gas detector using one of the MQ sensors.

    Gas sensors from MQ family are analog tin dioxide detectors which change their resistance in the presence of volatile compounds like gases or smoke. Except MQ-7 and MQ-9 which are designed for carbon monoxide detection and require alternating heater voltage, with analog output being read at the end of each heater voltage cycle, every other sensor may be used in the following circuit.

    Gas detector based on MQ-2 without microcontroller
    Gas detector with MQ-2 module on breadboard

    Read more

    Značky: #MQ-2, #Analog, #Sensor, #Gas, #Electronics, #Elektro

    • On chevron_right

      I/O voltage level shifting: passive down-converters

      pubsub.slavino.sk / onetransistor · Wednesday, 25 January, 2023 - 16:20 edit

    When interfacing various devices to a microcontroller, some kind of voltage conversion is often needed. The most common voltage levels of development boards and modules are 3.3 V and 5 V, yet it is not out of the ordinary to find devices using 2.5 V or even 1.8 V I/O levels. This post will explore some of the available methods of converting I/O voltage levels to ensure compatibility between electronic modules and ICs. When I say compatibility I mean the devices connected together through a level shifter should work as expected and not cause damage to each other.

    I began searching information about level shifting after a failed attempt to interface an ESP8266 board (3.3 V I/O) to an array of 74HC595-74HC165 shift registers which were required to be powered at 5 V (therefore they expect 5 V I/O). Without documenting too much, I considered 74HC would recognize high 3.3 V output from microcontroller. But that was not the case as I would soon discover. The next step was to add a MOSFET bidirectional level shifter (the ones which are commonly used for I2C), however strange behavior occurred.

    I/O voltage level shifting: passive down-converters

    Read more

    Značky: #Electronics, #Theory, #Elektro

    • On chevron_right

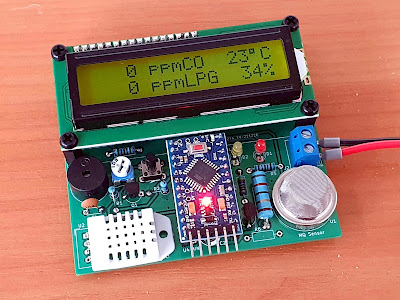
      CO and LPG gas sensor with Arduino and LCD

      pubsub.slavino.sk / onetransistor · Sunday, 15 January, 2023 - 14:09 edit

    In a previous post I looked at a MQ-9 sensor module. Unfortunately, although the sensor can detect CO and LPG, it cannot be used as it is wired in the module. After analyzing the datasheet I figured the best thing to do is remove it from existing PCB and build my own. In short, like other sensors from MQ family, MQ-9 has a heater resistor inside. In order to get any useful reading from it, this resistor must be heated at 5 V for 60 seconds, then cooled at 1.4 V for 90 seconds. The same is true for MQ-7. The issue with modules is that all sensors from MQ family are fitted on the same PCB design.

    In this post, I'll share two other methods of powering the heater resistor and I will design a PCB. Sensor readings will be displayed on an alphanumeric LCD powered by Arduino. Since real ppm is temperature and humidity dependent, I will provide a PCB header for DHT sensor. I already tested the sensor with the LM317 power supply I built in the previous post, and I did some measurements.

    CO and LPG gas sensor with Arduino and LCD
    Read more

    Značky: #Gas, #Sensor, #Electronics, #Elektro, #MQ-9, #Arduino

    • On chevron_right

      Interface MQ gas sensor modules to 3.3V development boards

      pubsub.slavino.sk / onetransistor · Sunday, 1 January, 2023 - 17:46 edit

    Sensors from MQ family are tin dioxide smoke and gas detectors with analog output. Tin dioxide changes its resistance when exposed to gases, but it has to be heated. This is why these sensors have a heater resistor made of nichrome wire. MQ sensors are not suitable for battery powered devices since the heater requires a lot of current. In a previous post I took an MQ-2 module, changed some resistors on its PCB and interfaced it to Arduino.

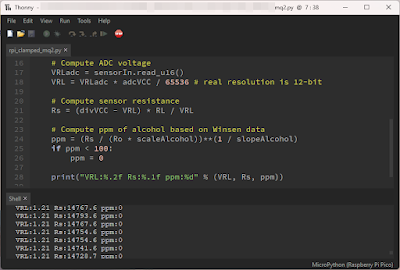
    Let's explore the possibilities of interfacing such modules to 3.3 V development boards. There are advantages like possibility of IoT integration, higher ADC resolution and more computing power on 32-bit architecture. There is however an... analog issue. When exposed to high concentrations of gas, the voltage across load resistor (RL) will go higher than 3.3 V. This could damage the ADC. We'll see in this post methods of scaling down the output voltage on load resistor.

    MQ-2 readings with Raspberry Pi Pico

    Read more

    Značky: #MQ-2, #Electronics, #Elektro, #Sensor