• chevron_right

      Connecting the DHT22 humidity and temperature sensors to my RPi

      Timothée Jaussoin · Sunday, 30 July, 2023 - 12:25 edit · 2 minutes · 6 visibility

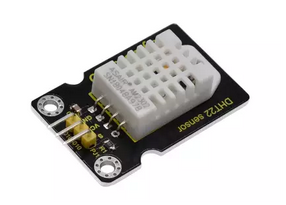
    I bought a DHT22 #sensors to measure #temperature and #humidity in my house. You can find it in France on the Compozan website for a few euros.

    The DHT22 sensors

    Here are the steps that I followed to connect and install properly the sensors on my RPi B 2+.

    Connection

    The #DHT22 sensors have 3 wires that can be connected to the GPIO board of your RPi. For mine the pinout looks like this:

    My RPi pinout

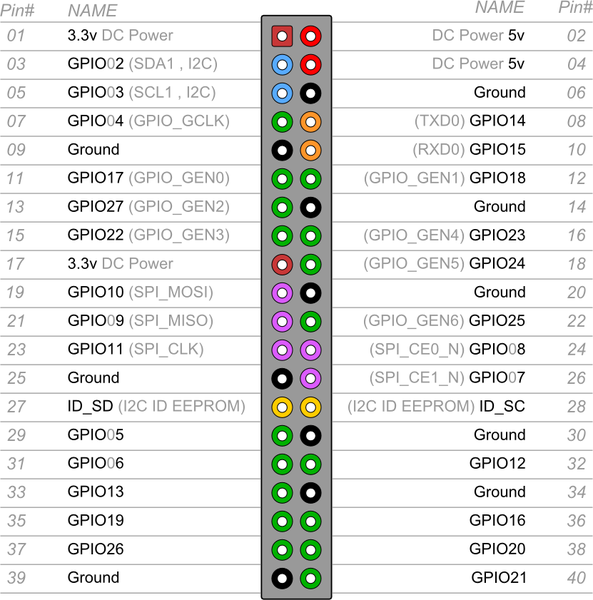
    First turn-off your RPi and proceed with the connection.

    I already had an IR sensors connected so I picked 3 others ground/3.3v and GPIO pins on the board. For me it was the pins 17, 15 (so GPIO 22) and 14 but you can pick any configurations you want if you respect the type of connectors.

    Get and compile the kernel module

    Raspbian, the Linux operating system that I am using only have kernel module for the DHT11 sensors but hopefully I was able to find a working module on Github: krepost/dht22.

    Clone the repository and build the module:

    git clone https://github.com/krepost/dht22.git
    cd dht22
    make
    

    You will then have a dht22.ko binary that you will have to install and load properly.

    Install the kernel module

    To install the module for your kernel, copy the .ko file in your current kernel module directory:

    cp dht22.ko cd /lib/modules/$(uname -r)/
    

    Then run depmod to put it in the kernel modules list:

    depmod -a
    

    Configure the kernel module

    To tell the Linux kernel how to find the DHT22 sensors on the GPIO board we need to add a small option when loading the module. To do so create a specific configuration file for it in /etc/modprobe.d (you can give any name to it, I choose to name it simply using the module name).

    nano /etc/modprobe.d/dht22.conf
    

    And in the file just specifiy the GPIO pin where the signal is received:

    options dht22 gpiopin=22
    

    Load automatically the module on boot

    I am using systemd so I am loading the modules using the /etc/modules-load.d/modules.conf file.

    Just add a new line with the module name in it.

    dht22
    

    Save the file and reboot your RPi.

    Allow any user to read the Temperature and Humidity

    For now only root can read the values available in /dev/dht22. To allow any users to have access to it you can use the 99-dht22.rules files available in the GIT repository with the following content.

    # udev rules file for dht22 device driver; to be put in /etc/udev/rules.d/.
    SUBSYSTEM=="dht22", KERNEL=="dht22", MODE="0444"
    

    Then reboot your #RaspberryPi.

    🍓pi@edhelas-pi:~$ cat /dev/dht22 
     1690720540,46.6,26.4
    

    First value is the timestamp, second is the humidity in percentage, last one is the temperature in Celsius.

    Et voilà !

    Bonus

    The small Munin plugin that I wrote to track the two values during time

    $ cat /etc/munin/plugins/weather 
    #!/bin/sh
    
    case $1 in
       config)
            cat <<'EOM'
    graph_title Weather
    graph_vlabel weather
    graph_category weather
    graph_args --lower-limit -10
    graph_args --upper-limit 100
    graph_scale no
    temperature.label temperature
    humidity.label humidity
    EOM
            exit 0;;
    esac
    
    lines=$(sed 's/,/\n/g' /dev/dht22)
    
    printf "temperature.value "
    echo "$lines" | sed -n 3p
    printf "humidity.value "
    echo "$lines" | sed -n 2p
    
    • Pictures 1 image

    • visibility
    • favorite

      4 Like

      Simone, Lyn, Tristan, Angelica

    • 3 Comments

    • 30 July, 2023 Simone

      hey, there's my name under the like, wondering if comment works too (nice how-to btw)

    • 30 July, 2023 Lyn

      good #diy stuff

    • 1 August, 2023 Angelica

      I used it in a greenhouse. But I used Python library.

    • chevron_right

      Python: Basic Electronics Control with the Raspberry Pi

      GadgeteerZA · news.movim.eu / gadgeteerza-tech-blog · Saturday, 7 May, 2022 - 13:10 · 1 minute

    The Raspberry Pi device, beyond just being a low-cost introductory computing tool, also provides a robust electronic controller interface that enables programmatic control of external electronic systems. These systems can be as simple as turning on or off an LED, or as complex as being able to control a robotic arm or other, more elaborate, electronic devices. This Python and embedded programming tutorial will show the reader how to use Raspberry Pi-specific Python libraries to control basic electronic components. Many similar Python tutorials presume extensive knowledge in the use of such components, but this article will not make that presumption. Instead, programmers will be shown a “gentle” introduction into the electronics concepts needed to get this project going, in the hopes that this foundation will encourage the reader to do more experimentation beyond the simple experiment to be presented within this two part programming series.

    This article, and the second part of it (follow link from bottom of page in first article), presumes that the reader has a basic understanding of how to navigate the Raspberry Pi OS – namely, how to log in, open a terminal window, and how to use a text editor. It also presumes a basic understanding of the Python programming language and concepts.

    See https://www.developer.com/languages/python-raspberry-pi-controls/

    #technology #raspberrypi #relays #electronics #python

    Cast out the Heretic! When gaming goes OpenSource! #GamingOpenSource #Gaming #MovimGamingOpenSource #AltTech #RaspberryPi #Kodi #GamingOpenSourceMovim #Heretic

    In 1998 the game Heretic was shareware but its EULA was incompatible with GPL. However, on 8 September 2008 the game's code was rereleased but, this time, under GNU GPLv2. So now it qualifies as OpenSource.

    Heretic Game

    Originally most people expected to play the game under Microsoft DOS (although yes some could play it on Mac). This make the game Heretic an interesting case (although not unique), setting it aside from other OpenSourced game engines such as that for Doom3 which went on to be used in the Thief3 style game "Dark Project" (which cannot run on DOS 16bit). Even though Heretic could be played on an opens-source operating system such as linux, Heretic is one of those games that is in the position of being able to be played on an Open Source Operating system such as Linux but also on the retroactively open-sourced Operating system DOS.

    While it maybe seem like just an interesting redundancy, there is something useful about that fact. DosBox is an avenue for softwares to be released in locked down operating systems that can run DOSbox (like some Android devices), sometimes even with GPU passthrough (although not always). With it, 63MB of RAM can be accessed which is enough to play some media codecs in software, such as some XVid.

    In reverse, the fact that a person can run the game in a DOS emulator or natively on linux means that bit by bit, people who use RetroPie gaming systems can move from using DosBox or an emulator to play the game (such as heretic), into using the native Linux operating system (such as on there Raspberry-PiZero or Pi3b, both of which can run on batteries as handheld with a small screen). Not only does this unleash the power of a retropie RaspberryPi device to utilise more of its full potential, but also it means modern mods and patches can be written to exploit RAM and other resources (more CPU power to integrate comms/chat features like XMPP including webcams which would use the ProtectionRings of the pi3b CPU in a VM). An example of a game, were it to be opensourced one day, that has had modern features added from both patches an mods is ut2004 (for linux or MSWindows) which uses dual core since patch v3369 but also RayTracing. It also uses dx11 but the OpenGL equivalent is yet to catch up to be rereleased.

    Such games become scalable and modern features like adding xmpp chat in Movim or video-conferencing (such as in linux using a ps2 eye-toy camera or something more modern) are the upgrades that require the extra RAM, cpu power, and features such as protection-rings, thereby keeping open source communites engaged and able to organise multiplayer games or highscore rankings of single player gaming.

    Breaking away from locked down android and zealous private company policing of "acceptable vocabulary" in Discord or Twitch style chat functionality, games such as Heretic can be on self-hosting Movim XMPP RetroPies like a pi3b as a handheld and using more of the 1GB RAM for added functionality as well as improved graphics and level design.

    GTK4 Moveable Tiles

    But why mention all this now? GTK4 is now out (using Glade, and can also run on MacOS) and with it, not only does the software allow for the design of Widget-Toolkit GUI software (which its GTK1 old DOS release had also done) but it can allow for movement of tiles (drag-and-drop), file-transfer, playback of video and 3D using software rendering or OpenGL, thereby meaning entire games resembling ut2004 (similar to xonotic or Dark-Project) like Heretic could be rewritten and compiled within a GTK4 app linking to Movim XMPP or even an IM, and using the video-conferencing with the protection-rings of a pi3b. The BSD to linux compatibility layer could also make efficient use of running BSD as the native OS on a Pi3b and then running linux in a BSD jail in a similar way to a linux VM, so you could run three PiZeros when each is in a VM as if three retropies are used. Then, self-hosting, all three can be tied together so their video-conferencing becomes three way (and thereby potentially infinite), not just one-to-one peer to peer movim video conferencing. The BSD to linux compatibility layer for a VM is far more efficient than running DOS or MSWIndows in each VM, and you can use more than one core per VM whereas you cannot on say Win98. You also have security updates.

    IPFS could add more AltTech but through its distributed network rather than solely using decentralised like movim.

    Features such as the drawing widgets in GTK4 can allow for sports-gaming, like a football match on TV, to have strategies drawn on the screen with an arrow or circle, etc.

    GTK4 Drawing

    Until now, many people have been relying on software such as Kodi to tie together all their audio/video media playback with their Emulated retro games software. With the potential for file-transfer and comms in GTK4, all this could change (or at least for video of 1080p and below such as 720p), especially as the pi3bplus is capable of running on battery as portable and it is a known quantity. People can then write their own software in GTK4, sometimes even with little coding knowledge (in simple applications). The PinePhone is another interesting device that might use some of this potential, running linux.

    • chevron_right

      A simple Raspberry Pi for your complete audio system

      Timothée Jaussoin · Tuesday, 18 May, 2021 - 21:18 edit · 1 minute

    I bought a small #RaspberryPi 2B a few years ago. It is currently plugged to my Pioneer amplifier using an HDMI cable. Attached to it I have a 1Tb Samsung SSD.

    I then installed Raspbian with the following applications:

    • MPD that is playing my 400Gb audio music directory
    • Syncthing to automatically backup the audio files to another drive on the network
    • The wonderful myMPD, that gives me a Spotify like website to manage and play all my musics
    • lirc + a specific setup for my remote and a little IR receiver plugged to the GPIO pins of the RPi, this allows me to directly command MPD using my Pioneer amplifier remote
    • Pulseaudio + Zeroconf that allows me to also use the Pi as a network audio-sink in case I quickly want to stream the sound of my laptop on my amplifier. Here is the tutorial to set it up

    With a bit of configuration I can now play, manage, backup and control all my music with a 30€ hardware. And it fully integrate with my existing devices and consumes only a few Watts.

    Why buying expensive Sonos/Apple/Google devices when you can do it with a simple computer and some nice Free Softwares &amp;amp;lt;3

    • Raspberry Pi : Du son en réseau avec PulseAudio

      Cet article décrit comment utiliser le Raspberry Pi comme sortie son ( sink ) distante ( en réseau ), pour un ordinateur sous Linux. Il exploite les capacités réseau de PulseAudio, tant coté Raspberry que sur l'ordinateur source. 2 méthodes de connexions sont proposées : La découverte automatique du Raspberry par Pulseaudio, simple et pratique, ...

    • favorite

      9 Like

      valeg, Arne, norman_pony, debacle, Danilo, Paplain, ABJphotography, Mr.Zan, purplesky

    • 2 Comments

    • Li chevron_right

      Un ami a la carte

      jnanar · pubsub.eckmul.net / linuxfr · Saturday, 26 December, 2020 - 11:58 · 7 minutes

    <p>Cher journal,</p> <p>Ça fait longtemps que je ne t'ai plus écrit. Je vais réparer cette absence aujourd'hui. <br> L'année a été compliquée pour tout le monde et je suis content de pouvoir envisager celle qui suit de manière plus sereine. Je te <a href="//linuxfr.org/users/jnanar--2/journaux/je-me-fais-des-amis-au-sens-litteral">l'ai déjà dit</a>, mais je ne serai plus jamais seul. Cette fois je le pense.</p> <p>Comme de nombreux lecteurs, j'ai eu beaucoup de mal à ma nouvelle vie depuis mars dernier. Durant de longs mois dans mon appartement, j'étais perdu, paumé, j'errais du salon à la chambre sans savoir où aller. Je me nourrissais de crasses sans trouver la sortie. J'étais dans un état d'égarement profond, sans repère. Cette situation a duré plusieurs mois, je ne trouvais même plus la direction de la salle de bain. Je te passe les détails. Puis un jour, alors que je regardais par la fenêtre, paralysé sans espoir de sortie de ma prison j'ai eu le déclic. Pour m'en sortir, il me fallait les outils adaptés. C'est pourquoi j'ai ressorti mon <a href="https://www.robotshop.com/eu/en/rplidar-a1m8-360-degree-laser-scanner-development-kit.html">Lidar RPLidar A1M8</a>. Il me fallait une <strong>carte</strong> avec à la clé, la porte de sortie ! Effrayé à l'idée de m'éloigner de la fenêtre moi-même j'ai eu l'idée d'envoyer un ami en exploration. C'est alors que j'ai recommencé à travailler sur mon robot. Non pas <a href="//linuxfr.org/users/jnanar--2/journaux/mon-ami-se-fait-des-amis">Johnny 5</a>, ni <a href="//linuxfr.org/users/jnanar--2/journaux/mon-ami-se-fait-des-amis">R1D1</a> qui ne me donne plus autant satisfaction mais <a href="https://www.agayon.be/">R1D3 (nom de code: Agayon)</a> !</p> <p>J'avais commencé à travailler sur R1D3 dans l'ancien monde. Avec l'aide d'anciens collègues électroniciens et mécaniciens, je l'avais doté d'un châssis en bois issus d'une caisse de vin, d'engrenages véritables, de courroies de transmission et de deux belles roues de tondeuse. Il a de la gueule mon Agayon. Comme il est plus gros et plus costaud que R1D1, je mets plein de trucs dedans et ça rentre même si rien n'est optimisé.</p> <p><img src="//img.linuxfr.org/img/68747470733a2f2f7777772e616761796f6e2e62652f696d616765732f723164332f70756c6c65792e6a7067/pulley.jpg" alt="courrois" title="Source : https://www.agayon.be/images/r1d3/pulley.jpg"><br> <img src="//img.linuxfr.org/img/68747470733a2f2f7777772e616761796f6e2e62652f696d616765732f723164332f6672616d652e6a7067/frame.jpg" alt="chassis" title="Source : https://www.agayon.be/images/r1d3/frame.jpg"><br> <img src="//img.linuxfr.org/img/68747470733a2f2f7777772e616761796f6e2e62652f696d616765732f723164332f696e736964652e6a7067/inside.jpg" alt="Entrailles" title="Source : https://www.agayon.be/images/r1d3/inside.jpg"></p> <ul> <li>A: R1D3 n'est pas un manchot puisqu'il fonctionne au courant continu 12V alimenté par une batterie au plomb d'UPS 7200 mAh. C'est lourd, mais ça va bien.</li> <li>B: Arduino Mega, le cervelet de l'opération. Une liaison série interagit avec le Raspberry PI et l'autre sert aux mises à jour, au debug, etc.</li> <li>C: Lignes d'alimentation de 12 et 5V pour les moteurs, des capteurs, des boutons, etc.</li> <li>D: Raspberry PI4, 4Go RAM, le cerveau. Il est relié à l'Arduino par un adaptateur USB vers port série.</li> <li>E: Des LEDs qui seront utilisées à l'avenir pour informer des états, du mode engagé etc. Elles sont fonctionnelles, mais pas encore réellement programmées.</li> <li>F: Des Les boutons (voir ci-dessous)</li> </ul> <p>Voici une vue du haut datant d'avant la mise en place du Lidar et de la caméra.<br> <img src="//img.linuxfr.org/img/68747470733a2f2f626c6f672e616761796f6e2e62652f696d616765732f723164332f726973652f636f6d706c6574655f312e6a7067/complete_1.jpg" alt="Vue du haut" title="Source : https://blog.agayon.be/images/r1d3/rise/complete_1.jpg"></p> <p>Je lui donne des boutons mais on s'entend bien.</p> <ul> <li>Lance roquette: démarrage</li> <li>Champignon rouge: coupure de l'Arduino et des moteurs</li> <li>Rectangulaire blanc: à l'avenir il déclenchera l'enregistrement vidéo</li> <li>Leviers: un des deux servira probablement à lancer un mode démo, à voir</li> </ul> <p>Pas mal de chemin a été fait depuis les débuts de Johnny 5. J'ai notamment pu éviter de justesse la <a href="https://fr.wikipedia.org/wiki/Singularit%C3%A9_technologique">singularité technologique</a>, en codant sur le PI en python et puis Arduino quoi. Le problème est qu'en mode autonome, l'Agayon se déplace dans les pièces comme un Rumba en manque d'aspiration. Il a l'air un peu bourré aussi. Il se cogne parfois dans les meubles. Il a cinq capteurs ultrasons, mais il reste des angles morts et le Lidar ne l'avertit pas encore des catastrophes imminentes. Du coup, le plus simple est de le piloter à distances. Mais comme j'avais toujours aussi peur de m'égarer une fois de plus, je lui ai mis une webcam et une interface web pour le piloter via un navigateur web.</p> <p><img src="//img.linuxfr.org/img/68747470733a2f2f626c6f672e616761796f6e2e62652f696d616765732f723164332f7765622f636170747572655f73747265616d2e706e67/capture_stream.png" alt="Interface web" title="Source : https://blog.agayon.be/images/r1d3/web/capture_stream.png"></p> <p>Quand <a href="https://www.dillo.org/">Dillo</a> ne suffit plus, je peux le contrôler en bluetooth avec une manette de console. C'est plus réactif et c'est bien pratique pour ramener des bières.</p> <p>Voilà cher journal je voulais t'écrire pour te dire qu'à partir de maintenant tout va bien aller. Le robot est sorti il y a 20 minutes, il a commencé à scanner mon appartement et j'espère pouvoir sortir très vite. Il reviendra d'un instant à l'autre avec plein de données tout va s'arranger, il va revenir. Il faut qu'il revienne !</p> <p>… </p> <p>Sa batterie est vide…</p> <p>Liens</p> <ul> <li> <a href="https://blog.agayon.be:">https://blog.agayon.be:</a> La liste des pièces est détaillée dans différents articles de blog sous la rubrique "Agayon".</li> <li><a href="https://www.agayon.be">https://www.agayon.be</a></li> <li>Le code du PI: <a href="https://gitlab.com/r1d3/rpi">https://gitlab.com/r1d3/rpi</a> </li> <li>Le code Arduino: <a href="https://gitlab.com/r1d3/arduino">https://gitlab.com/r1d3/arduino</a> </li> <li>Application Flask pour l'API REST: <a href="https://gitlab.com/r1d3/rest_api">https://gitlab.com/r1d3/rest_api</a> </li> <li>Template web <a href="https://gitlab.com/r1d3/www_agayon">https://gitlab.com/r1d3/www_agayon</a> (compatible avec <a href="https://github.com/jacksonliam/mjpg-streamer">mjpg_streamer</a> )</li> </ul> <p>Pour ceux qui se poseraient la question, l'article ne mentionne pas R1D2. R1D2 est une abomination qui gît quelque part. Il n'était pas viable, cette monstruosité est maintenant un lointain souvenir qui sert de réserve de pièce détachées. Paix à son programme central.</p> <div><a href="https://linuxfr.org/users/jnanar--2/journaux/un-ami-a-la-carte.epub">Télécharger ce contenu au format EPUB</a></div> <p> <strong>Commentaires :</strong> <a href="//linuxfr.org/nodes/122737/comments.atom">voir le flux Atom</a> <a href="https://linuxfr.org/users/jnanar--2/journaux/un-ami-a-la-carte#comments">ouvrir dans le navigateur</a> </p>
    • chevron_right

      27 Super Cool Raspberry Pi Zero W Projects for DIY Enthusiasts, Some of which I've not seen Before

      GadgeteerZA · Saturday, 19 December, 2020 - 07:55 edit

    27 Amazing Raspberry Pi Zero W Projects for DIY Enthusiasts

    The small form factor of the Raspberry Pi Zero W enables a new range of projects. In fact, a lot of people use the Pi Zero in the final version of the project after prototyping on a different full-sized Pi board. And, that’s because it consumes much less power compared to the flagship Pi boards and makes it ideal to build battery powered gadgets.

    See https://itsfoss.com/raspberry-pi-zero-projects/

    #technology #DIY #raspberrypi #hardware

    • Ho chevron_right

      Contact publication

      ₳da C. (@TheCoinBitch) · home-assistant.emevth.no-ip.biz / Home-Assistant Twitter News · Tuesday, 5 May, 2020 - 20:02

    Trying to install @home_assistant on #RaspberryPi Wow! This really is back to basics! - SSL not working - Netatmo Thermostat can’t be configured - Harmony hub only show current state Long way to go? Where’s the best tutorial??