• chevron_right

      Client based filtering in Unbound

      pubsub.slavino.sk / nlnetlabs · Thursday, 22 December, 2016 - 14:10 edit · 3 minutes

    By Ralph Dolmans

    We noticed a demand from resolver operators to depend DNS answers on the address of the client. The tag functionality introduced in Unbound 1.5.10 and the new views functionality in Unbound 1.6.0 meet these wishes.

    Tags

    Unbound’s tags functionality makes it possible to divide client source addresses in categories (tags), and use local-zone and local-data information for these specific tags.

    Let’s say we like to have two tags, one for domains containing malware, and one for domains of gambling sites. Before these tags can be used, you need to define them in the Unbound configuration using define-tags :

    define-tags: "malware gambling"

    Now that we made Unbound aware of the existing tags, we can start using them. The access-control-tag element is used to specify the tag to use for a client addresses. It is possible to add multiple tags to an access-control element:

    access-control-tag: 10.0.1.0/24 "malware"
    access-control-tag: 10.0.2.0/24 "malware"
    access-control-tag: 10.0.3.0/24 "gambling"
    access-control-tag: 10.0.4.0/24 "malware gambling"

    Unbound will create an access-control-tag element with the “allow” type if the IP netblock in the access-control-tag element does not match an existing access-control .

    When a query comes in from an address with a tag, Unbound starts searching its local-zone tree for the best match. The best match is the most specific local-zone with a matching tag, or without any tag. That means that local-zones without any tag will be used for all clients and tagged local-zones only for clients with matching tags.

    Adding tags to local-zones can be done using the local-zone-tag element.

    local-zone: malwarehere.example refuse
    local-zone: somegamblingsite.example static
    local-zone: matchestwotags.example transparent
    local-zone: notags.example inform
    local-zone-tag: malwarehere.example malware
    local-zone-tag: somegamblingsite.example malware
    local-zone-tag: matchestwotags.example "malware gambling"

    A local-zone can have multiple tags, as illustrated in above example. The tagged local-zones will be used if one or more tags match the client. So, the matchestwotags.example local-zone will be used for all clients with at least the malware or gambling tag. The used local-zone type will be the type specified in the matching local-zone. It is possible to depend the local-zone type on the client address and tag combination. Setting tag specific local-zone types can be done using access-control-tag-action .

    access-control-tag-action: 10.0.1.0/24 "malware" refuse
    access-control-tag-action: 10.0.2.0/24 "malware" deny

    Besides configuring a local-zone type for some specific client address/tag match, it is also possible to set the used local-data RRs. This can be done using the access-control-tag-data element.

    access-control-tag-data: 10.0.4.0/24 "gambling" "A 127.0.0.1"

    Sometimes you might want to override a local-zone type for a specific netblock, regardless the type configured for tagged and untagged localzones, and regardless the type configured using access-control-tag action. This override can be done using local-zone-override .

    Views

    Unbound's tags make is possible to divide a large number of local-zones in categories, and assign these categories to a large number of netblocks. The tags on the netblocks and local-zones are stored in bitmaps, it is therefore advised to keep the number of tags low. If a lot of clients have their own local-zones, without sharing these to other netblocks, it can results in lots of tags. In this situation is is more convenient to give the client's netblock its own tree containing local-zones. Another benefit of having a separate local zone tree is that it makes it possible to apply a local-zone action to a part of the domain space, without having other local-zone elements of subdomains overriding this. Configuring a client specific local-zone tree can be done using views.

    Starting from version 1.6.0, Unbound offers the possibility to configures views. A view in Unbound is a named list of configuration options. The currently supported view configuration options are local-zone and local-data.

    A view is configured using a view clause. There may be multiple view clauses each with a unique name.

    view:
    name: "firstview"
    local-zone: example.com inform
    local-data: 'example.com TXT "this is an example"'
    local-zone: refused.example.nl refuse

    Mapping a view to a client can be done using the access-control-view element.

    access-control-view: 10.0.5.0/24 firstview

    By default, view configuration options override the global (outside the view) configuration. So, when a client matches a view it will only use the view's local-zone tree. This behaviour can be changed by setting view-first to yes. If view-first is enabled, Unbound will try to use the view's local-zone tree, and if there is no match it will search the global tree.


    Client based filtering in Unbound was originally published in The NLnet Labs Blog on Medium, where people are continuing the conversation by highlighting and responding to this story.


    Značky: #Network, #dns, #software-development, #internet-security
    • chevron_right

      I Can’t Believe It’s Not DNS!

      pubsub.slavino.sk / nlnetlabs · Tuesday, 16 August, 2016 - 15:14 edit · 5 minutes

    By Yuri Schaeffer

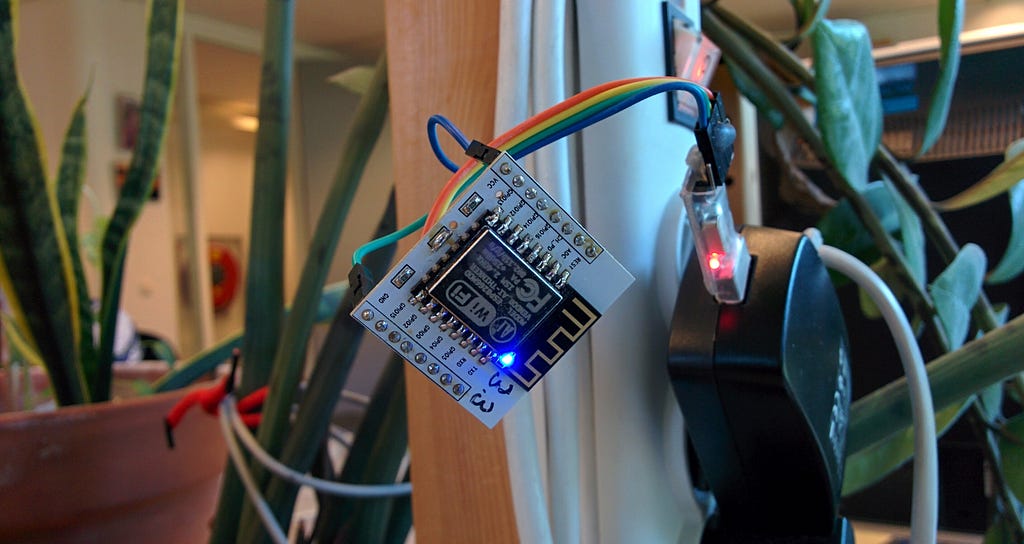
    “I Can’t Believe It’s Not DNS!” is an authoritative DNS server on ESP8266 written in MicroPython. It has the following anti-features:

    • No storage of zone files, AXFR each boot.
    • DNSSEC filtering.
    • TSIG-less AXFR support!
    • Notify ‘handling’.
    • Highly optimized: no sanity checks.

    Jumping on the Bandwagon

    The Espressif ESP8266 is one of the favorite microcontrollers of IoT-Hipsters for some time. There are many models varying in specs. Typically these devices have 0.5 to 4 MiB of flash, 64KiB instruction memory, run at 80MHz and have a couple of GPIO pins and an analogue input. Their unique selling point however is that they have Wifi built in and cost only a few bucks. Literally. For 4 Euro you can be known as ‘Mr fancy pants with his own reset button and usb port’.

    Its wifi is quite capable and can do 802.11 b/g/n. So what do these hipsters use these chips for? Well sadly, mainly for logging their sensor data to the cloud via JSON over a websocket. Because websockets are better regular sockets right? Right.

    (Close) Encounter of the First Kind

    What’s interesting is that not only can you program these thing directly (there is a gcc based toolchain available), but there is also a ready firmware for it: NodeMCU . NodeMCU lets you write code in Lua. Having experience with the ESP nor Lua I needed a ‘hello world’ type of project. Something doable, but a bit more out of my comfort zone than blinking an LED. Oh I know, I’ll write an DNS server.

    Long story short: Lua on the ESP is a pain and I don’t like it. NodeMCU could echo DNS queries over TCP with almost 2qps . Over UDP, who knows? The API never allowed me to discover the source address or port of an incoming UDP message. Don’t stray of the path of the IoT people when using NodeMCU.

    And Now For Something Completely Different

    Recently, after a successful crowdfunding campaign, MicroPython was released for the ESP and I decided I would give it another go. And thus “I Can’t Believe It’s Not DNS!” was born. “Not DNS” because while it might reply with DNS-like messages it is far from complete and correct. But it will serve you with about 200qps !

    The premise is that this is going to be a plug and forget kind of device. We can’t just ssh in to it and change the zonefile, thus on startup we need to do an AXFR. My zone is around 20 records or so, it surely must fit? Well no. After receiving the AXFR and trying to use the data required more allocations: ENOMEM. Crud.

    Python to the rescue! We can make an iterator that we would feed a socket and would spit out parsed Resource records! Little memory overhead, easy does it. Except… DNS uses compression pointers. Compression pointers greatly reduce the size of DNS packets by eliminating repeating of owner names. BUT we don’t have enough memory to buffer the entire AXFR to resolve those pointers. We need a plan.

    Almost There

    Plan A. So a compression pointer is just an octet pointing back relative to its current position right? (HINT: No it isn’t, I’m being an idiot). So I just need to keep a sliding window of the last 256 bytes! In reality a compression pointer is 14 bits wide and absolute from the start of the message. Most names will point to one of the very first resource records in the message. So let us also keep a copy of the first 256 bytes. That surely must catch 99 percent of all cases, and we just drop any record we can’t resolve the pointer for. Who cares! Well, that is mostly true. But I wasn’t satisfied with the amount of records dropped in my small zone. So nothing else to do but store the AXFR on flash you say? Oh you don’t know me! It’s personal now, I have a plan B.

    Being There

    Plan B. What if we don’t resolve the compression pointers during the AXFR? That’s right, just let them sit unresolved for a bit. In the mean time drop all those pesky DNSSEC records we are offered. Those are to big anyway and I really don’t want to deal with NSEC lookups on this tiny device. Also, while we are at it drop anything other than class IN, that does not exist in my world. We end up with just a small set of records. But how do we resolve the owner names, we don’t have this data any more?

    I know somebody who has this data… the master! You know what? With that set of records in hand do _another_ AXFR a couple of bytes at the time and resolve those pointers on the fly without the need to buffer anything longer than a label (max 63 bytes). Of course compression pointers can be nested so we need to repeat this process in a loop until every pointer is resolved!

    Are You Being Served?

    Serving queries is the easy part. Lets do as little as possible. When a query comes in we chop of anything beyond the question section. BAM ! We have most of our reply done. Fiddle a bit with the flags and section counts, assume query name is uncompressed and append our resource record. Our database only contains TYPE and RDATA. Query name? Always a pointer to byte 12 in the query packet. Class? always IN. TLL? always 15 minutes, deal with it.

    Finally we need a mechanism to update our little DNS server if the zone has changed. Serious software would keep track of the version of the zone via the SOA serial number. Poll for a new version on set times, listen to notifies from the master and make an intelligible decision when and how to update the zone. We don’t have the memory available to be intelligible. But we can listen for notify queries. If we receive a notify, any notify — we optimized out any ACL or checking of the zone name, we simply reboot(). The ESP8266 will powercycle and the new version of the zone will be transferred and served. SOA serial management made easy!

    Final Thoughts

    It should be clear to everybody this software is crap. It sort of mimics DNS but really it isn’t. You should not use this, I should not use this (but you know I will because hosting my zone on a ESP8266 is freaking awesome!)


    I Can’t Believe It’s Not DNS! was originally published in The NLnet Labs Blog on Medium, where people are continuing the conversation by highlighting and responding to this story.


    Značky: #python, #dns, #Network, #micropython

    • chevron_right

      Algorithm Rollover in OpenDNSSEC 1.3

      pubsub.slavino.sk / nlnetlabs · Thursday, 29 October, 2015 - 10:57 edit · 7 minutes

    By Yuri Schaeffer

    Erratum: Unfortunately it appears that this method does not work for OpenDNSSEC 1.4.x. It still works for 1.3.x, specifically 1.3.18 is tested (thanks Michał Kępień!).

    The current version of OpenDNSSEC is unable to perform an algorithm rollover. Blindly changing the KSK and ZSK algorithm in the kasp.xml will result in a bogus zone. The only option to do it is to go unsigned: Remove the DS record, wait, publish unsigned zone, and then start signing with the new algorithm. This is undesirable.

    There is however a way to roll to a new algorithm securely if you are clever about it and don’t mind some manual intervention. We have worked out a way for you to do this. The nice part is that it requires no manual interaction with the HSM, and that ods-signerd, the signer daemon, can keep running without any interruptions. This means there needs to be no service downtime, your zonefile can still be updated and resigned during this process. For simplicity, a requirement is that your new keys must be of the same length as your old keys.

    Also, please note that since we are working with key pairs, the key material should be compatible. This method allows us to switch between different RSA signature algorithms. For example from RSA/SHA-1 to RSA/SHA-256 but not from RSA/SHA-256 to P-256/SHA-256.

    1 — Stop Enforcer

    First we must stop ods-enforcerd. We will not start it again until the whole process is finished. Make sure nothing autostarts it, which could very well disrupt the whole rollover process badly. Also please make sure you are not currently in a rollover of some sort. Your signconf must mention two keys exactly. A KSK and a ZSK.

    2 — Duplicate ZSK

    We will edit the signing configuration for your zone. To persuade the signer to double sign everything we will introduce a new ZSK. But rather than generating a new key we will reuse the key material of the old key. This file will generally live under /var/opendnssec/signconf/ .

    Thus the following section…

    <Keys>
    <Key>
    <Flags>257</Flags>
    <Algorithm>5</Algorithm>
    <Locator>b530cf857e0bf2768e3cbf8d59a572d6</Locator>
    <KSK />
    <Publish />
    </Key>
    <Key>
    <Flags>256</Flags>
    <Algorithm>5</Algorithm>
    <Locator>d4823c2f7eedceab5e5e3fd2c16c5dc4</Locator>
    <ZSK />
    <Publish />
    </Key>
    </Keys>

    would become

    <Keys>
    <Key>
    <Flags>257</Flags>
    <Algorithm>5</Algorithm>
    <Locator>b530cf857e0bf2768e3cbf8d59a572d6</Locator>
    <KSK />
    <Publish />
    </Key>
    <Key>
    <Flags>256</Flags>
    <Algorithm>5</Algorithm>
    <Locator>d4823c2f7eedceab5e5e3fd2c16c5dc4</Locator>
    <ZSK />
    <Publish />
    </Key>
    <Key>
    <Flags>256</Flags>
    <Algorithm>8</Algorithm>
    <Locator>d4823c2f7eedceab5e5e3fd2c16c5dc4</Locator>
    <ZSK />
    </Key>
    </Keys>

    Take care not to include the <Publish /> element for the new key.

    Now the signer must pickup this change:

    $ ods-signer update opendnssec.org

    Note that at this point the signer is instructed to double sign your entire zone. It might take a long time for large zones, and your zone will possibly almost double in size. This is the only way to do a secure algorithm rollover in DNSSEC. Also, all your DNSSEC responses increase in size.

    One might be tempted to also publish the DNSKEY records of the KSK and ZSK at this time. However I advise against that. If this is done, it is possible for a resolver to retrieve the new DNSKEY RRset (containing the new algorithm) but to have RRsets in its cache with signatures created by the old DNSKEY RRset (i.e., without the new algorithm). [see RFC6781]

    We have to make sure every signature is picked up by intermediate resolvers before introducing the new DNSKEY records. Whatever the longest TTL is in your zone, dictates how long you have to wait before starting STEP 3.

    3 — Duplicate KSK

    For the KSK we do the same trick as for the ZSK: introduce a new key that uses the same key material as the old key. Your <Keys> section in the signconf will now look like this:

    <Keys>
    <Key>
    <Flags>257</Flags>
    <Algorithm>5</Algorithm>
    <Locator>b530cf857e0bf2768e3cbf8d59a572d6</Locator>
    <KSK />
    <Publish />
    </Key>
    <Key>
    <Flags>256</Flags>
    <Algorithm>5</Algorithm>
    <Locator>d4823c2f7eedceab5e5e3fd2c16c5dc4</Locator>
    <ZSK />
    <Publish />
    </Key>
    <Key>
    <Flags>257</Flags>
    <Algorithm>8</Algorithm>
    <Locator>b530cf857e0bf2768e3cbf8d59a572d6</Locator>
    <KSK />
    <Publish />
    </Key>
    <Key>
    <Flags>256</Flags>
    <Algorithm>8</Algorithm>
    <Locator>d4823c2f7eedceab5e5e3fd2c16c5dc4</Locator>
    <ZSK />
    <Publish />
    </Key>
    </Keys>

    This time we add the <Publish /> element to our new ZSK. Again we notify the signer of the changed signconf for our zone. Since algoritihm rollover is not officially supported it might take some effort to convince the signer to pick up all the changes:

    $ ods-signer update opendnssec.org
    $ ods-signer clear opendnssec.org
    $ ods-signer sign opendnssec.org

    At this point only the DNSKEY RRset should be changed. Once the resulting zone is transferred proceed to the next step.

    We must be sure everyone was able to pick up the new DNSKEY RRset. Thus before proceeding to the next step wait at least the TTL of the DNSKEY RRset. You can find the TTL in the <keys> section of kasp.xml. Don’t even consider rushing over this step! Waiting here is of utter most importance.

    4 — Generate DS

    Since our DNSKEY changed, our DS will also be different. We can’t ask ods-ksmutil for the DS this time since it isn’t in the database yet. We can find the DNSKEY ofcource in the signed zonefile, a grep or even a simple dig should give it to us. Then we need to calculate the DS.

    $ dig opendnssec.org DNSKEY |grep 257 > dnskeys
    $ ldns-key2ds -n dnskeys

    At this point you can switch the old DS record at the parent for the new one. Either in one action or add the newest first and then remove the oldest.

    Then there is more waiting involved: the TTL of the DS record. Query your parent or look it up in the KASP. <Parent><DS><TTL>.

    5 — Clean up

    We will now remove the old KSK section from signconf, notify the signer and wait for TTL of DNSKEY RRset. We then remove the old ZSK entry from the signconf and notify the signer. (No need to wait here.)

    $ ods-signer clear opendnssec.org
    $ ods-signer sign opendnssec.org

    6 — Mangle the Database

    To get the enforcer state in line with the latest signconf is easy. Only the algorithm number is set different. A quick database edit can fix it. For Example:

    $ sqlite3 /var/opendnssec/kasp.db
    sqlite> UPDATE `keypairs` SET `algorithm`=8 WHERE
    `HSMkey_id`='d4823c2f7eedceab5e5e3fd2c16c5dc4' OR
    `HSMkey_id`='b530cf857e0bf2768e3cbf8d59a572d6';
    $ mysql -u ods-db-usr opendnssec -p
    mysql> UPDATE `keypairs` SET `algorithm`=8 WHERE
    `HSMkey_id`='d4823c2f7eedceab5e5e3fd2c16c5dc4' OR
    `HSMkey_id`='b530cf857e0bf2768e3cbf8d59a572d6';

    The HSMkey_id can be find in the signconf as <Locator>.

    7 — Start Enforcer

    If everything was executed according to plan, the enforcer daemon once started should produce the same signconf as the one we last fabricated by hand. I recommend to verify this before feeding the signconf to the signer.


    Algorithm Rollover in OpenDNSSEC 1.3 was originally published in The NLnet Labs Blog on Medium, where people are continuing the conversation by highlighting and responding to this story.


    Značky: #dns, #crypto, #cybersecurity, #software-development, #Network, #infosec

    • chevron_right

      NSD 4.1: zonefile-mode and fork fix

      pubsub.slavino.sk / nlnetlabs · Friday, 19 September, 2014 - 12:03 edit · 2 minutes

    By Wouter Wijngaards

    Use zone files and not nsd.db

    NSD 4.1 has been released and it contains a new feature where NSD does not use the nsd.db file, but uses the zonefiles directly. The feature can be turned on by configuring one line in nsd.conf, it can also be turned off by changing that line back, the server needs to be restarted to effect the change.

    nsd.conf excerpt:

    # this line disables nsd.db, and the text format zonefiles
    # are used directly
    database: ""

    With this config statement NSD reads the zonefiles for zones upon startup. This takes about the same time as reading the nsd.db file. The memory usage without the nsd.db file is about 50%-60% lower. When zone transfers (for secondary zones) update the zone information, NSD writes the new contents back to the zonefile.

    The zonefiles are written every hour, with a timer that can be configured with the zonefiles-write: 3600 configuration statement. This sets the time in seconds when you want the zonefiles to be written back to disk. NSD first writes the file to file~ and then renames that to the original filename to protect against filesystem space problems. Read and write to zonefiles is slightly slower than to nsd.db, the performance of NSD in queries per second is not impacted. NSD does not write the entire zonefile everytime a change occurs because that would be very slow, especially in the case of many incremental zone transfers, that is why the zonefiles-write timer only writes the entire file after a specified time has elapsed.

    You can check zonefiles before loading them with the new nsd-checkzone tool that prints if the zonefile contains errors. It uses the same parse code as NSD.

    Linux fork problems fixed

    The NSD mode of operation forks processes, specifically for every zone update that is processed. Because NSD4 supports provisioning of many more zones than NSD3 does, many more forks are performed when these zones update frequently. This caused problems in Linux systems, because Linux cannot handle this specific sequence of fork operations that NSD used.

    The system leaked memory for the NSD process, until the system became unstable (after days). The workaround, in NSD 4.1, forks in a different pattern that does not cause the Linux implementation to leak the vm chunk information in the Linux process memory tables. This information was not really leaked, it was cleaned up on process exit, so a stop and start of the daemon could also workaround the problem, but it accumulated while the daemon was running.

    The fork pattern that caused the failures for Linux was a pattern where the deepest forked process forks new copies that replace all the older processes, and this in a sequence. The new pattern takes efforts to have a higher up (parent) process fork the new copies, at the expense of having the UNIX signals delivered to the wrong processes afterwards, NSD now uses pipes to communicate that information, where for SIGCHILD it uses the property that pipes are closed by Linux when a process exits (and it was the only process that held that file descriptor).


    NSD 4.1: zonefile-mode and fork fix was originally published in The NLnet Labs Blog on Medium, where people are continuing the conversation by highlighting and responding to this story.


    Značky: #dns, #software-development, #nsd4, #Network, #nsd

    • chevron_right

      OpenDNSSEC project transferred to NLnet Labs

      pubsub.slavino.sk / nlnetlabs · Monday, 15 September, 2014 - 12:02 edit · 2 minutes

    By Benno Overeinder

    NLnet Labs announces that it will take full responsibility for continuing the activities of both the OpenDNSSEC software project as well as the support activities of the Swedish OpenDNSSEC AB. OpenDNSSEC was created as an open source turn-key solution for DNSSEC, managing the security of domain names on the Internet. The project drives adoption of Domain Name System Security Extensions (DNSSEC) to further enhance Internet security.

    After initiating the OpenDNSSEC project in cooperation with UK Internet registry Nominet, the project and development has been managed by the Swedish Internet Structure Foundation (responsible for .SE) for more than 4 years. NLnet Labs contributed strongly from the early days onwards. Working closely together, both organizations agreed upon the transition of the project ownership to NLnet Labs.

    NLnet Labs and its 100% subsidiary Open Netlabs BV, will continue the development and support from August 2014 onwards. There is a strong need to move forward — as the project has picked up pace — and increase the global acceptance and implementations of OpenDNSSEC. Embedding the project, product, and support in a sustainable environment will help achieving its original objectives and providing the required added value of the OpenDNSSEC software products. In order to allocate sufficient development capacity, NLnet Labs recently opened vacancies for junior and senior software system engineers.

    About NLnet Labs

    The NLnet Labs Foundation (NLnet Labs for short) is a not for profit foundation founded in 1999 in the Netherlands. Its statutes define its objectives: to develop Open Source software and open standards for the benefit of the Internet. The foundation believes that the Openness of the network, as enabled by technology and policy, thrives human wellbeing and prosperity. By contributing technology and expertise in the form of Open Source Software and Open Standards, we contribute to wellbeing and prosperity for all.

    About Open Netlabs

    Open Netlabs is a support and consultancy company, globally supporting organisations using NLnet Labs’ open source software and assisting customers in the implementation and operations of their DNS-infrastructure. High level support and SLA’s, consultancy and training are the core of the services portfolio of Open Netlabs. Open Netlabs BV is a wholly owned, taxable subsidiary of the NLnet Labs Foundation, serving the non-profit public benefit goals of its parent. The company is guided and managed according the charter of the NLnet Labs Foundation.


    OpenDNSSEC project transferred to NLnet Labs was originally published in The NLnet Labs Blog on Medium, where people are continuing the conversation by highlighting and responding to this story.


    Značky: #dns, #dnssec, #software-development, #Network, #internet-security

    • chevron_right

      Hackathon at TNW-2014

      pubsub.slavino.sk / nlnetlabs · Thursday, 1 May, 2014 - 14:01 edit · 3 minutes

    By Wouter Wijngaards and Olaf Kolkman

    Context

    At NLnet Labs we believe that DNSSEC allows for security innovations that will change the global security and privacy landscape. Innovations like DANE, a technology that allows people to use the global DNS to bootstrap a encrypted channel, are only the start of currently unimaginable technical innovation.

    The deployment of DNSSEC is a typical collective action problem and we are trying to make a difference by providing the tools that help to reduce costs or bring value for those who want to provision, provide, and use secured DNS data.

    The GETDNS API plays in that space. It is an attempt to provide applications a tool to get DNSSEC information that will aid the improvement of security and privacy.

    The GETDNS API

    The GETDNS API is an API description designed by application developers for accessing DNS asynchronously with DNSSEC and DANE functionality. The GETDNS API is implemented in a collaboration effort by Verisign and NLnet Labs in the getdns library.

    The TNW 2014 conference in Amsterdam, the Netherlands, hosted a Hack Battle this year. Participants made ‘hacks’: apps or tools; using provided APIs and their own tools and competed in this contest. The contest ran for 36 hours and with 146 participants produced a number of contest entries. Verisign Labs and NLnet Labs promoted the use of the GETDNS.API library for DNSSEC, security, privacy and DANE implementation. This library and thus the API was available to the participants. In the contest the C API, the node.js API and the python API were available.

    Four entries have been made using the GETDNS.API, those participants received GetDNS Tshirts. The other teams in the back battle can be viewed here .

    The presentations of the teams are on video, youtube link .

    verify’EM

    By Ruslan Mavlyutov, Arvind Narayanan and Bhavna Soman.

    This entry created a plugin for Thunderbird, in python, that checks the DNSSEC credentials of DKIM record associated with an email. The user can see the status of the email.

    This entry won the prize given by NLnet Labs (Raspberry Pi™ kits)!

    hackerleague link

    Bootstrapping Trust with DANE

    By Sathya Gunasekaran and Iain Learmonth.

    This entry adds DNSSEC secured OTR-key lookups to the python-based gajim XMPP client. This project allows people that use OTR in their jabber client to check if the fingerprint of a key matches the fingerprints published in the DNS. They built a python library that uses getdnsapi to fetch OTR, openPGP and S/MIME fingerprints.

    This team was interviewed by the Dutch Tweakers website, video link .

    Github python dnskeys library link .

    Github gajim branch .

    DANE Doctor

    By Hynek Schlawack and Richard Wall.

    This entry is a website for debugging DANE. It shows diagnostics and highlights errors.

    They also integrated the python bindings for getdns with the asynchronous python framework Twisted. They hope to be able to contribute this as a DANE enabled TLS client API to the Twisted framework.

    Github link .

    DNSSEC name and shame!

    By Tom Cuddy and Joel Purra.

    This entry wants to highlight which contest sponsors do the right thing to protect DNS data and shame the ones that do it wrong.

    This team won the prize given by PayPal, because of the importance of protecting DNS data.

    Github link and website link .

    The GETDNS API specification is edited by Paul Hoffman . Verisign Labs and NLnet Labs are cooperating on the implementation of the API using code and expertise from the Unbound and ldns projects. The getdnsapi implementation website , twitter .


    Hackathon at TNW-2014 was originally published in The NLnet Labs Blog on Medium, where people are continuing the conversation by highlighting and responding to this story.


    Značky: #getdns-api, #Network, #general

    • chevron_right

      Does Open Data Reveal National Critical Infrastructures?

      pubsub.slavino.sk / nlnetlabs · Friday, 21 February, 2014 - 14:31 edit · 4 minutes

    This blog post is based on the report “ Open Data Analysis to Retrieve Sensitive Information Regarding National-Centric Critical Infrastructures ” by Renato Fontana.

    Democratization of Public Data

    The ideas of Open Data comes from the concept that data should be freely available to use, reuse, and redistribute by anyone. An important motivation in making information available via the Open Data Initiative was the desire for openness and transparency of (local) government and private sectors. Besides openness and transparency, also economic value can be created by improvement of data quality through feedback on published data. Typically, most content available through Open Data repositories refers to government accountability, companies acceptance, financing statistics, national demographics, geographic information, health quality, crime rates, or infrastructure measurements.

    The volume of data available in Open Data repositories supporting this democratization of information is growing exponentially as new datasets are made public. Meanwhile, organisations should be aware that data can contain classified information, i.e., information that should not be made publicly available. The explosive rate of publishing open data can exert the information classification process to the limit, and possibly increase the likelihood of disclosure of sensitive information.

    The disclosure of a single dataset may not represent a security risk, but when compiled with further information, it can truly reveal particular areas of a national critical infrastructure. Visualisation techniques can be applied to identify patters and gain insights where a number of critical infrastructure sectors overlap.

    This blog post shows that is possible to identify these specific areas by only taking into account the public nature of information contained in Open Data repositories.

    Method and Approach

    In this study, we focus on Open Data repositories in the Netherlands. After identifying the main sources of Open Data (see details in report ), web crawlers and advanced search engines were used to retrieve all machine readable formats of data, e.g., .csv, .xls, .json. A data sanitation phase is necessary to remove all blank and unstructured entries from the obtained files.

    After the data sanitation, some initial considerations can be made by observing the raw data in the files. For example, finding a common or primary identifier among datasets is an optimal approach to cross-reference information. In a next step, the datasets can be visualised in a layered manner, allowing for the identification of patterns (correlations) in the data by human cognitive perception. In visualisation analysis, this sense-making loop is a continuously interaction between using data to create hypothesis and visualisation to acquire insights.

    As the research was scoped to the Netherlands and Amsterdam, the proof of concept took into the account the government definition of “ critical infrastructures ”. Also, research was limited to datasets referring to energy resources and ICT. A visualization layer was created based on each dataset that could refer to a critical infrastructure.

    Visualisation of Data

    From the different Open Data sets, a layered visualisation is generated and shown below. The figure provides sufficient insights to illustrate that most data centers in Amsterdam are geographically close to the main energy sources. It also suggests which power plants may behave as backup sources in case of service disruption. In the case of Hemweg power plant located in Westpoort, it is clear how critical this facility is by observing the output amount in megawatts being generated and the high-resource demanding infrastructures around it.

    Four layer visualisation. The darker green areas are also the sectors where the highest number of data centers (blue dots) and power plants (red dots) are concentrated in Amsterdam.

    A few datasets contained fields with entry values flagged as “ afgeschermd” , suggesting the existing concern in not revealing sensitive information. The desire to obfuscate some areas can be seen as an institutional interest in enforcing security measurements. Thus, that such information is sensitive and its disclosure can be considered as a security threat.

    Conclusions and Considerations

    Results and insights in this research are considered not trivial to be obtained. Even within a short time frame for analysis over a specific set of data, we were able to derive interesting conclusions regarding the national critical infrastructures. Conclusions of this nature can be something that governments and interested parties want to avoid to be easily obtained due to national security purposes.

    The presented research confirms the possibility to derive conclusions from critical infrastructure regions based on public data. The approach involved the implementation of a feedback (sense-making) loop process and continuous visualization of data. This ongoing effort may create space to discuss in which extent this approach can be considered beneficial or dangerous. Such discussion must be left to an open debate, which must also consider the matter of Open Data and national security.

    To open or not to open data?


    Does Open Data Reveal National Critical Infrastructures? was originally published in The NLnet Labs Blog on Medium, where people are continuing the conversation by highlighting and responding to this story.


    Značky: #Network, #security