• Pl chevron_right

      DKIM: rotate and publish your keys

      pubsub.slavino.sk / planetdebian · Tuesday, 15 August, 2023 - 00:16 · 5 minutes

    If you are an email system administrator, you are probably using DKIM to sign your outgoing emails. You should be rotating the key regularly and automatically, and publishing old private keys. I have just released dkim-rotate 1.0 ; dkim-rotate is tool to do this key rotation and publication.

    If you are an email user, your email provider ought to be doing this. If this is not done, your emails are “non-repudiable”, meaning that if they are leaked, anyone (eg, journalists, haters) can verify that they are authentic, and prove that it to others. This is not desirable (for you).

    Non-repudiation of emails is undesirable

    This problem was described at some length in Matthew Green’s article Ok Google: please publish your DKIM secret keys .

    Avoiding non-repudiation sounds a bit like lying. After all, I’m advising creating a situation where some people can’t verify that something is true, even though it is. So I’m advocating casting doubt. Crucially, though, it’s doubt about facts that ought to be private. When you send an email, that’s between you and the recipient. Normally you don’t intend for anyone, anywhere, who happens to get a copy, to be able to verify that it was really you that sent it.

    In practical terms, this verifiability has already been used by journalists to verify stolen emails. Associated Press provide a verification tool .

    Advice for all email users

    As a user, you probably don’t want your emails to be non-repudiable. (Other people might want to be able to prove you sent some email, but your email system ought to serve your interests, not theirs.)

    So, your email provider ought to be rotating their DKIM keys, and publishing their old ones. At a rough guess, your provider probably isn’t :-(.

    How to tell by looking at email headers

    A quick and dirty way to guess is to have a friend look at the email headers of a message you sent. (It is important that the friend uses a different email provider, since often DKIM signatures are not applied within a single email system.)

    If your friend sees a DKIM-Signature header then the message is DKIM signed. If they don’t, then it wasn’t. Most email traversing the public internet is DKIM signed nowadays; so if they don’t see the header probably they’re not looking using the right tools, or they’re actually on the same email system as you.

    In messages signed by a system running dkim-rotate, there will also be a header about the key rotation, to notify potential verifiers of the situation. Other systems that avoid non-repudiation-through-DKIM might do something similar. dkim-rotate’s header looks like this:

    DKIM-Signature-Warning: NOTE REGARDING DKIM KEY COMPROMISE
     https://www.chiark.greenend.org.uk/dkim-rotate/README.txt
     https://www.chiark.greenend.org.uk/dkim-rotate/ae/aeb689c2066c5b3fee673355309fe1c7.pem

    But an email system might do half of the job of dkim-rotate: regularly rotating the key would cause the signatures of old emails to fail to verify, which is a good start. In that case there probably won’t be such a header.

    Testing verification of new and old messages

    You can also try verifying the signatures. This isn’t entirely straightforward, especially if you don’t have access to low-level mail tooling. Your friend will need to be able to save emails as raw whole headers and body , un-decoded, un-rendered.

    If your friend is using a traditional Unix mail program, they should save the message as an mbox file. Otherwise, ProPublica have instructions for attaching and transferring and obtaining the raw email . (Scroll down to “How to Check DKIM and ARC”.)

    Checking that recent emails are verifiable

    Firstly, have your friend test that they can in fact verify a DKIM signature. This will demonstrate that the next test, where the verification is supposed to fail, is working properly and fails for the right reasons.

    Send your friend a test email now, and have them do this on a Linux system:

        # save the message as test-email.mbox
        apt install libmail-dkim-perl # or equivalent on another distro
        dkimproxy-verify <test-email.mbox

    You should see output containing something like this:

        originator address: ijackson@chiark.greenend.org.uk
        signature identity: @chiark.greenend.org.uk
        verify result: pass
        ...

    If the output ontains verify result: fail (body has been altered) then probably your friend didn’t manage to faithfully save the unalterered raw message.

    Checking old emails cannot be verified

    When you both have that working, have your friend find an older email of yours, from (say) month ago. Perform the same steps.

    Hopefully they will see something like this:

        originator address: ijackson@chiark.greenend.org.uk
        signature identity: @chiark.greenend.org.uk
        verify result: fail (bad RSA signature)

    or maybe

        verify result: invalid (public key: not available)

    This indicates that this old email can no longer be verified. That’s good: it means that anyone who steals a copy, can’t verify it either. If it’s leaked, the journalist who receives it won’t know it’s genuine and unmodified; they should then be suspicious.

    If your friend sees verify result: pass , then they have verified that that old email of yours is genuine. Anyone who had a copy of the mail can do that. This is good for email thieves, but not for you.

    For email admins: announcing dkim-rotate 1.0

    I have been running dkim-rotate 0.4 on my infrastructure, since last August. and I had entirely forgotten about it: it has run flawlessly for a year. I was reminded of the topic by seeing DKIM in other blog posts. Obviously, it is time to decreee that dkim-rotate is 1.0 .

    If you’re a mail system administrator, your users are best served if you use something like dkim-rotate. The package is available in Debian stable, and supports Exim out of the box, but other MTAs should be easy to support too, via some simple ad-hoc scripting.

    Limitation of this approach

    Even with this key rotation approach, emails remain nonrepudiable for a short period after they’re sent - typically, a few days.

    Someone who obtains a leaked email very promptly, and shows it to the journalist (for example) right away, can still convince the journalist. This is not great, but at least it doesn’t apply to the vast bulk of your email archive.

    There are possible email protocol improvements which might help, but they’re quite out of scope for this article.


    comment count unavailable comments

    Značky: #Debian

    • Pl chevron_right

      listadmin3: An imperfect replacement for listadmin on Mailman 3

      pubsub.slavino.sk / planetdebian · Monday, 14 August, 2023 - 17:28 · 2 minutes

    One of the annoyances I had when I upgraded from Buster to Bullseye (yes, I’m talking about an upgrade I did at the end of 2021) is that I ended up moving from Mailman 2 to Mailman 3. Which is fine, I guess, but it meant I could no longer use listadmin to deal with messages held for moderation. At the time I looked around, couldn’t find anything, shrugged, and became incredibly bad at performing my list moderation duties.

    Last week I finally accepted what I should have done at least a year ago and wrote some hopefully not too bad Python to web scrape the Mailman 3 admin interface. It then presents a list of subscribers and held messages that might need approved or discarded. It’s heavily inspired by listadmin, but not a faithful copy (partly because it’s been so long since I used it that I’m no longer familiar with its interface). Despite that I’ve called it listadmin3.

    It currently meets the bar of “extremely useful to me” so I’ve tagged v0.1. You can get it on Github . I’d be interested in knowing if it actually works for / is useful to anyone else (I suspect it won’t be happy with interfaces configured to not be in English, but that should be solvable). Comment here or reply to my Fediverse announcement .

    Example usage, cribbed directly from the README:

    $ listadmin3
    fetching data for partypeople@example.org ... 200 messages
    (1/200) 5303: omgitsspam@example.org / March 31, 2023, 6:39 a.m.:
      The message is not from a list member: TOP PICK
    (a)ccept, (d)iscard, (b)ody, (h)eaders, (s)kip, (q)uit? q
    Moving on...
    fetching data for admins@example.org ... 1 subscription requests
    (1/1) "The New Admin" <newadmin@example.org>
    (a)ccept, (d)iscard, (r)eject, (s)kip, (q)uit? a
    1 messages
    (1/1) 6560: anastyspamer@example.org / Aug. 13, 2023, 3:15 p.m.:
      The message is not from a list member: Buy my stuff!
    (a)ccept, (d)iscard, (b)ody, (h)eaders, (s)kip, (q)uit? d
    0 to accept, 1 to discard, proceed? (y/n) y
    fetching data for announce@example.org ... nothing in queue
    $
    

    There’s Debian packaging in the repository ( dpkg-buildpackage -uc -us -b will spit you out a .deb ) but I’m holding off on filing an ITP + actually uploading until I know if it’s useful enough for others before doing so. You only really need the listadmin3 file and to ensure you have Python3 + MechanicalSoup installed.

    (Yes, I still run mailing lists. Hell, I still run a Usenet server.)


    Značky: #Debian

    • wifi_tethering open_in_new

      This post is public

      www.earth.li /~noodles/blog/2023/08/announcing-listadmin3.html

    • Pl chevron_right

      Encoding “The Legend of Sisyphus”

      pubsub.slavino.sk / planetdebian · Monday, 14 August, 2023 - 16:30 · 11 minutes

    I watched this year's Assembly democompo live, as I usually do—or more precisely, I watched it on stream. I had heard that ASD would return with a demo for the first time in five years, and The legend of Sisyphus did not disappoint. At all. (No, it's not written in assembly; Assembly is the name of the party. :-) )

    I do fear that this is the last time we will see such a “blockbuster” demo (meaning, roughly: a demo that is a likely candidate for best high-end demo of the year) at Assembly, or even any non-demoscene-specific party; the scene is slowly retracting into itself, choosing to clump together in their (our?) own places and seeing the presence others mainly as an annoyance. But I digress.

    Anyway, most demos these days are watched through video captures; even though Navis has done a remarkable job of making it playable on not-state-of-the-art GPUs (the initial part even runs quite well on my Intel embedded GPU, although it just stops working from there), there's something about the convenience. And for my own part, I don't even have Windows, so realtime is mostly off-limits anyway. And this is a demo that really hates your encoder; lots of motion, noise layers, sharp edges that move around erratically. So even though there are some decent YouTube captures out there (and YouTube's encoder does a surprisingly good job in most parts), I wanted to make a truly good capture. One that gives you the real feeling of watching the demo on a high-end machine, without the inevitable blocking you get from a bitrate-constrained codec in really difficult situations.

    So, first problem is actually getting a decent capture; either completely uncompressed (well, losslessly compressed), or so lightly compressed that it doesn't really matter. neon put in a lot of work here with his 4070 Ti machine, but it proved to be quite difficult. For starters, it wouldn't run in .kkapture at all (I don't know the details). It ran under Capturinha , but in the most difficult places, the H.264 bitstream would simply be invalid, and a HEVC recording would not deliver frames for many seconds. Also, the recording was sometimes out-of-sync even though the demo itself played just fine (which we could compensate for, but it doesn't feel risk-free). A HDMI capture in 2560x1440 was problematic for other reasons involving EDIDs and capture cards.

    So I decided to see if I could peek inside it to see if there's a recording mode in the .exe; I mean, they usually upload their own video versions to YouTube, so it would be natural to have one, right? I did find a lot of semi-interesting things (though I didn't care to dive into the decompression code, which I guess is a lot of what makes the prod work at all), but it was also clear that there was no capture mode. However, I've done one-off renders earlier, so perhaps this was a good chance?

    But to do that, I would have to go from square one back to square zero , which is to have it run at all on my machine. No Windows, remember, and the prod wouldn't run at all in WINE (complaints about msvcp140.dll). Some fiddling with installing the right runtime through winetricks made it run (but do remember to use vcrun2022 and not vcrun2019, even though the DLL names are the same…), but everything was black. More looking inside the .exe revealed that this is probably an SDL issue; the code creates an “SDL renderer” (a way to software-render things onto the window), which works great on native Linux and on native Windows, but somehow not in WINE. But the renderer is never ever used for anything, so I could just nop out the call, and voila! Now I could see the dialog box. (Hey Navis, could you take out that call for the next time? You don't need BASS_Start either as long as you haven't called BASS_Stop. :-) ) The precalc is super-duper-slow under WINE due to some CPU usage issue; it seems there is maybe a lot of multi-threaded memory allocation that's not very fast on the WINE side. But whatever, I could wait those 15 minutes or so, and after that, the demo would actually run perfectly!

    Next up would be converting my newfound demo-running powers into a render. I was a bit disappointed to learn that WINE doesn't contain any special function hook machinery (you would think these things are both easier and more useful in a layered implementation like that, right?), so I went for the classic hacky way of making a proxy DLL that would pretend to be some of the utility DLLs the program used, forwarding some calls and intercepting others. We need to intercept the SwapBuffers call, to save each frame to disk, and some timing functions, so that we can get perfect frame pacing with no drops, no matter how slow or fast our machine is. (You can call this a poor man's .kkapture, but my use of these techniques actually predates .kkapture by quite a bit. I was happy he made something more polished back in the day, though, as I don't want to maintain hacky Windows-only software forever.)

    Thankfully for us, the strings “SDL2.dll” and “BASS.dll” are exactly the same length, so I hexedited both to say “hook.dll” instead, which supplied the remaining functions. SwapBuffers was easy; just do glReadPixels() and write the frame to disk. (I assumed I would need something faster with asynchronous readback to a PBO eventually, and probably also some PNG compression to save on I/O, but this was ludicrously fast as it was, so I never needed to change it.) Timing was trickier; the demo seems to use both _Xtick_get_time() (an internal MSVC timing function; I'd assume what Navis wrote was std::chrono, and then it got inlined into that call) and BASS. Every frame, it seems to compare those two timers, and then adjust its frame pacing to be a little faster or slower depending on which one is ahead. (Since its only options are delta * 0.97 or delta * 1.03, I'd guess it cannot ever run perfectly without jitter?) If it's more than 50 ms away from BASS, it even seeks the MP3 to match the real time! (I've heard complaints from some that the MP3 is skipping on their system, and I guess this is why.) I don't know exactly why this is done, but I'd guess there are some physical effects that can only run “from the start” (i.e., there is feedback from the previous frame) and isn't happy about too-large timesteps, so that getting a reliable time delta for each frame is important.

    Anyhow, this means it's not enough to hook BASS' timer functions, but we also need _Xtick_get_time() to give the same value (namely our current frame number divided by 59.94, suitably adjusted for units). This was a bit annoying, since this function lives in a third library, and I wasn't up for manually proxying all of the MSVC runtime. After some mulling, I found an unused SDL import (showing a message box), repurposed it to be _Xtick_get_time() and simply hexedited the 2–3 call sites to point to that import. Easy peasy, and the demo rendered perfectly to 300+ gigabytes of uncompressed 1440p frames without issue. (Well, I had an overflow issue at one point that caused the demo to go awry half-way, so I needed two renders instead of one. But this was refreshingly smooth.)

    I did consider hacking the binary to get an actual 2160p capture; Navis has been pretty clear that it looks better the more resolution you have, but it felt like tampering with his art in a disallowed way. (The demo gives you the choice between 720p, 1080p, and 1440p. There's also a “safe for work” option, but I'm not entirely sure what it actually does!)

    That left only the small matter of the actual encoding, or, the entire point of the exercise in the first place. I had already experimented a fair bit with this based on neon's captures, and had realized the main challenge is to keep up the image quality while still having a file that people can actually play, which is much trickier than I assumed. I originally wanted to use 10-bit AV1 , but even with dav1d , the players I tried could not reliably keep up the 1440p60 stream without dropping lots of frames. (It seemed to be somewhat single-thread bound, actually. mpv used 10% of that thread on updating its OSD, which sounded sort of wasted given that I didn't have it enabled.) I tried various 8- and 10-bit encodes with both aomenc and SVT-AV1 , and it just wasn't going well, so I had to abandon it. The point of this exercise, after all, is to be able to conveniently view the demo in high quality without having a monster machine. (The AV1 common knowledge seems to be that you should use Av1an as a wrapper to save you a lot of pain, but it doesn't have prebuilt Linux binaries or packages, depends on a zillion Rust crates and instantly segfaulted on startup for me. I doubt it would affect the main issue much anyway.)

    So I went a step down, to 10-bit HEVC, with an added bonus of a bit wider hardware support. (I know I wanted 10-bit, since 8-bit is frequently having issues in gradient-heavy content such as this, and I probably needed every bit of fidelity I could get anyway, assuming decoding could keep up.) I used Level 5.2 Main10 as a rough guide; it's what Quick Sync supports, and I would assume hardware UHD players can also generally deal with it. Level 5.2 (without the High tier), very roughly, caps the bitrate at maximum 60 Mbit/sec (I was generally using CRF encodes, but the max cap needed to come on top of that). Of course, if you just tell the encoder that 60 is max, it will happily “save up” bytes during the initial black segment (or generally, during anything that is easy) and then burst up to 500 Mbit/sec for a brief second when the cool explosions happen, so that's obviously out of the question—which means there are also buffer limitations (again very roughly, the rules say you can only use 60 Mbit on average during any given one-second window). Of course, software video players don't generally follow these specs (if they've even heard of them), so I still had some frame drops. I generally responded by tightening the buffer spec a bit, turning off a couple of HEVC features (surprisingly, the higher presets can make harder-to-decode videos!), and then accepting that slower machines (that also do not have hardware acceleration) will drop a few frames in the most difficult scenes.

    Over the course of a couple of days, I made dozens of test encodings using different settings, looking at them both in real time and sometimes using single-frame stepping. (Thank goodness for my 5950X!) More than once, I'd find that something that looked acceptable on my laptop was pretty bad on a 28" display, so a bit back and forth would be needed. There are many scenes that have the worst possible combination of things for a video encode; sharp edges, lots of motion, smooth gradients, motion… and actually, a bunch of scenes look smudgy (and sometimes even blocky) in a video compression-ish way, so having an uncompressed reference to compare to was useful.

    Generally I try to stay away from applying too-specific settings; there's a lot of cargo culting in video encoding, and most of it is based more on hearsay than on solid testing. I will say that I chickened out and disabled SAO, though, based on “some guy said on a forum it's bad for high-sharpness high-bitrate content”, so I'm not completely guilt-free here. Also, for one scene I actually had to simply tell the encoder what to do; I added a “zone” just before it to allocate fewer bits to that (where it wasn't as noticeable), and then set the quality just right for the problematic scene to not run out of bits and go super-blocky mid-sequence. It's not perfect, but even the zones system in x265 does not allow going past the max rate (which would be outside the given level anyway, of course). I also added a little metadata to make sure hardware players know the right color primaries etc.; at least one encoding on YouTube seems to have messed this up somehow, and is a bit too bright.

    Audio was easy; I just dropped in the MP3 wholesale. I didn't see the point of encoding it down to something lower-bitrate, given that anything that can decode 10-bit HEVC can also easily decode MP3, and it's maybe 0.1% of my total file size. For an AV1 encode, I'd definitely transcode to Opus since that's the WebM ecosystem for you, but this is HEVC. In a Mastroska mux, though, not MP4 (better metadata support, for one).

    All in all, I'm fairly satisfied with the result; it looks pretty good and plays OK on my laptop's software decoding most of the time (it plays great if I enable hardware acceleration), although I'm sure I've messed up something and it just barfs out on someone's machine. The irony is not lost on me that the file size ended up at 2.7 GB, after complaints that the demo itself is a bit over 600 MB compressed. (I do believe The Legend of Sisyphus actually defends its file size OK, although I would perhaps personally have preferred some sort of interpolation instead of storing all key frames separately at 30 Hz. I am less convinced about e.g. Pyrotech's 1+ GB production from the same party, though, or Fairlight's Mechasm. But as long as party rules allow arbitrary file sizes, we'll keep seeing these huge archives.) Even the 1440p YouTube video (in VP9) is about 1.1 GB, so perhaps I shouldn't have been surprised, but the bits really start piling on quickly for this kind of resolution and material.

    If you want to look at the capture (and thus, the demo), you can find it here . And now I think finally the boulder is resting at the top of the mountain for me, after having rolled down so many times. Until the next interesting demo comes along :-)


    Značky: #Debian

    • wifi_tethering open_in_new

      This post is public

      blog.sesse.net /blog/tech/2023-08-14-18-19_encoding_the_legend_of_sisyphus.html

    • Pl chevron_right

      Using iptables with systemd-networkd

      pubsub.slavino.sk / planetdebian · Sunday, 13 August, 2023 - 22:00 · 1 minute

    I used to rely on ifupdown to bring up my iptables firewall automatically using a config like this in /etc/network/interfaces :

    allow-hotplug eno1
    iface eno1 inet dhcp
        pre-up iptables-restore /etc/network/iptables.up.rules
    
    iface eno1 inet6 dhcp
        pre-up ip6tables-restore /etc/network/ip6tables.up.rules
    

    but I wanted to modernize my network configuration and make use of systemd-networkd after upgrading one of my servers to Debian bookworm .

    Since I already wrote an iptables dispatcher script for NetworkManager , I decided to follow the same approach for systemd-networkd.

    I started by installing networkd-dispatcher :

    apt install networkd-dispatcher
    

    and then adding a script for the routable state in /etc/networkd-dispatcher/routable.d/iptables :

    #!/bin/sh
    
    LOGFILE=/var/log/iptables.log
    
    if [ "$IFACE" = lo ]; then
        echo "$0: ignoring $IFACE for \`$STATE'" >> $LOGFILE
        exit 0
    fi
    
    case "$STATE" in
        routable)
            echo "$0: restoring iptables rules for $IFACE" >> $LOGFILE
            /sbin/iptables-restore /etc/network/iptables.up.rules >> $LOGFILE 2>&1
            /sbin/ip6tables-restore /etc/network/ip6tables.up.rules >> $LOGFILE 2>&1
            ;;
        *)
            echo "$0: nothing to do with $IFACE for \`$STATE'" >> $LOGFILE
            ;;
    esac
    

    before finally making that script executable (otherwise it won't run):

    chmod a+x /etc/NetworkManager/dispatcher.d/pre-up.d/iptables
    

    With this in place, I can put my iptables rules in the usual place ( /etc/network/iptables.up.rules and /etc/network/ip6tables.up.rules ) and use the handy iptables-apply and ip6tables-apply commands to test any changes to my firewall rules.

    Looking at /var/log/iptables.log confirms that it is being called correctly for each network interface as they are started.


    Značky: #Debian

    • Pl chevron_right

      Terrain base for 3D castle

      pubsub.slavino.sk / planetdebian · Sunday, 13 August, 2023 - 19:30 · 2 minutes

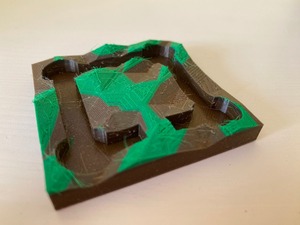
    terrain base for the castle

    I designed and printed a "terrain" base for my 3D castle in OpenSCAD. The castle was the first thing I designed and printed on our (then new) office 3D printer. I use it as a test bed if I want to try something new, and this time I wanted to try procedurally generating a model.

    I've released the OpenSCAD source for the terrain generator under the name Zarchscape .

    mid 90s terrain generation

    Lots of mid-90s games had very boxy floors

    Lots of mid-90s games had very boxy floors

    Terrain generation, 90s-style. From [this article](https://web.archive.org/web/19990822085321/http://www.gamedesign.net/tutorials/pavlock/cool-ass-terrain/)

    Terrain generation, 90s-style. From this article

    Back in the 90s I spent some time designing maps/levels/arenas for Quake and its sibling games (like Half-Life), mostly in the tool Worldcraft. A lot of beginner maps (including my own), ended up looking pretty boxy. I once stumbled across an article blog post that taught my a useful trick for making more natural-looking terrain. In brief: tessellate the floor region with triangle polygons, then randomly add some jitter to the z-dimension for their vertices. A really simple technique with fairly dramatic results.

    OpenSCAD

    Doing the same in OpenSCAD stretched me, and I think stretched OpenSCAD. It left me with some opinions which I'll try to write up in a future blog post.

    Final results

    multicolour

    I've generated and printed the result a couple of times, including an attempt a multicolour print.

    At home, I have a large spool of brown-coloured recycled PLA, and many small lengths of samples in various colours (that I picked up at Maker Faire Czech Republic last year ), including some short lengths of green.

    My home printer is a Prusa Mini , and I cheaped out and didn't buy the filament runout sensor, which would detect when the current filament ran out and let me handle the situation gracefully. Instead, I added several colour change instructions to the g-code at various heights, hoping that whatever plastic I loaded for each layer was enough to get the print to the next colour change instruction.

    The results are a little mixed I think. I didn't catch the final layer running out in time (forgetting that the Bowden tube also means I need to catch it running out before the loading gear, a few inches earlier than the nozzle), so the final lush green colour ends prematurely. I've also got a fair bit of stringing to clean up.

    Finally, all these non-flat planes really show up some of the limitations of regular Slicing. It would be interesting to try this with a non-planar Slicer .


    Značky: #Debian

    • Pl chevron_right

      #41: Using r2u in Codespaces

      pubsub.slavino.sk / planetdebian · Sunday, 13 August, 2023 - 15:11 · 4 minutes

    Welcome to the 41th post in the $R^4 series. This post draws on joint experiments first started by Grant building on the lovely work Eitsupi as part of our Rocker Project . In short, r2u is an ideal match for Codesspaces , a Microsoft/GitHub service to run code ‘locally but in the cloud’ via browser or Visual Studio Code . This posts co-serves as the README.md in the .devcontainer directory as well as a vignette for r2u .

    So let us get into it. Starting from the r2u repository, the .devcontainer directory provides a small self-containted file devcontainer.json to launch an executable environment R using r2u. It is based on the example in Grant McDermott’s codespaces-r2u repo and reuses its documentation. It is driven by the Rocker Project’s Devcontainer Features repo creating a fully functioning R environment for cloud use in a few minutes. And thanks to r2u you can add easily to this environment by installing new R packages in a fast and failsafe way.

    Try it out

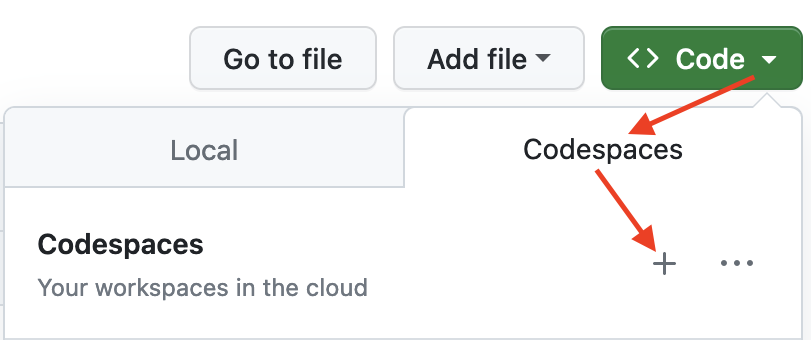
    To get started, simply click on the green “Code” button at the top right. Then select the “Codespaces” tab and click the “+” symbol to start a new Codespace.

    codespaces.png

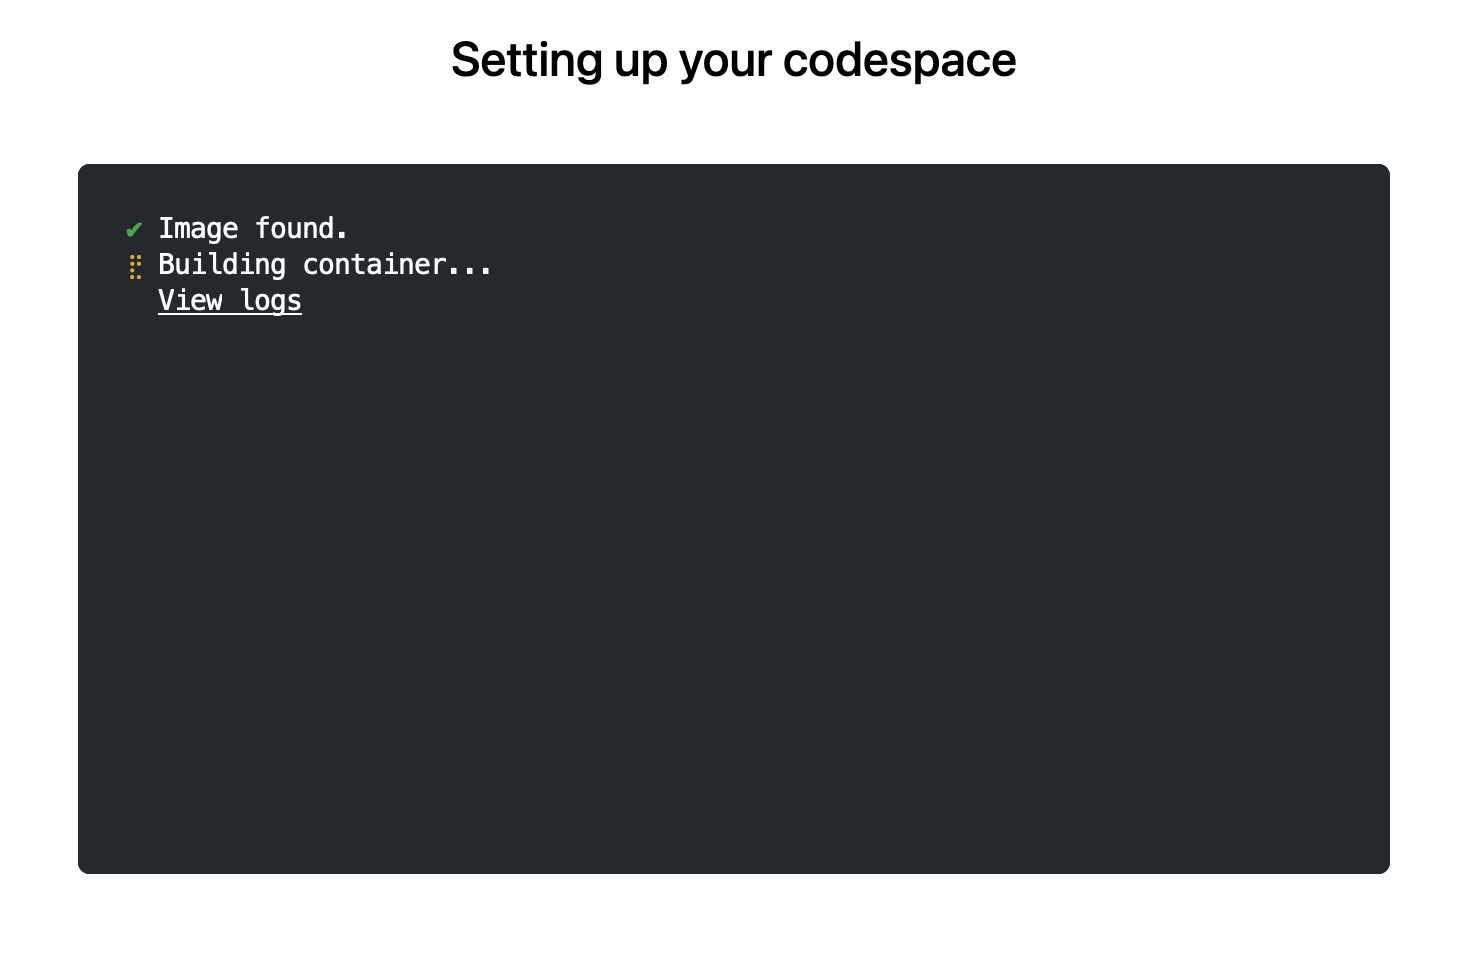
    The first time you do this, it will open up a new browser tab where your Codespace is being instantiated. This first-time instantiation will take a few minutes (feel free to click “View logs” to see how things are progressing) so please be patient. Once built, your Codespace will deploy almost immediately when you use it again in the future.

    instantiate.png

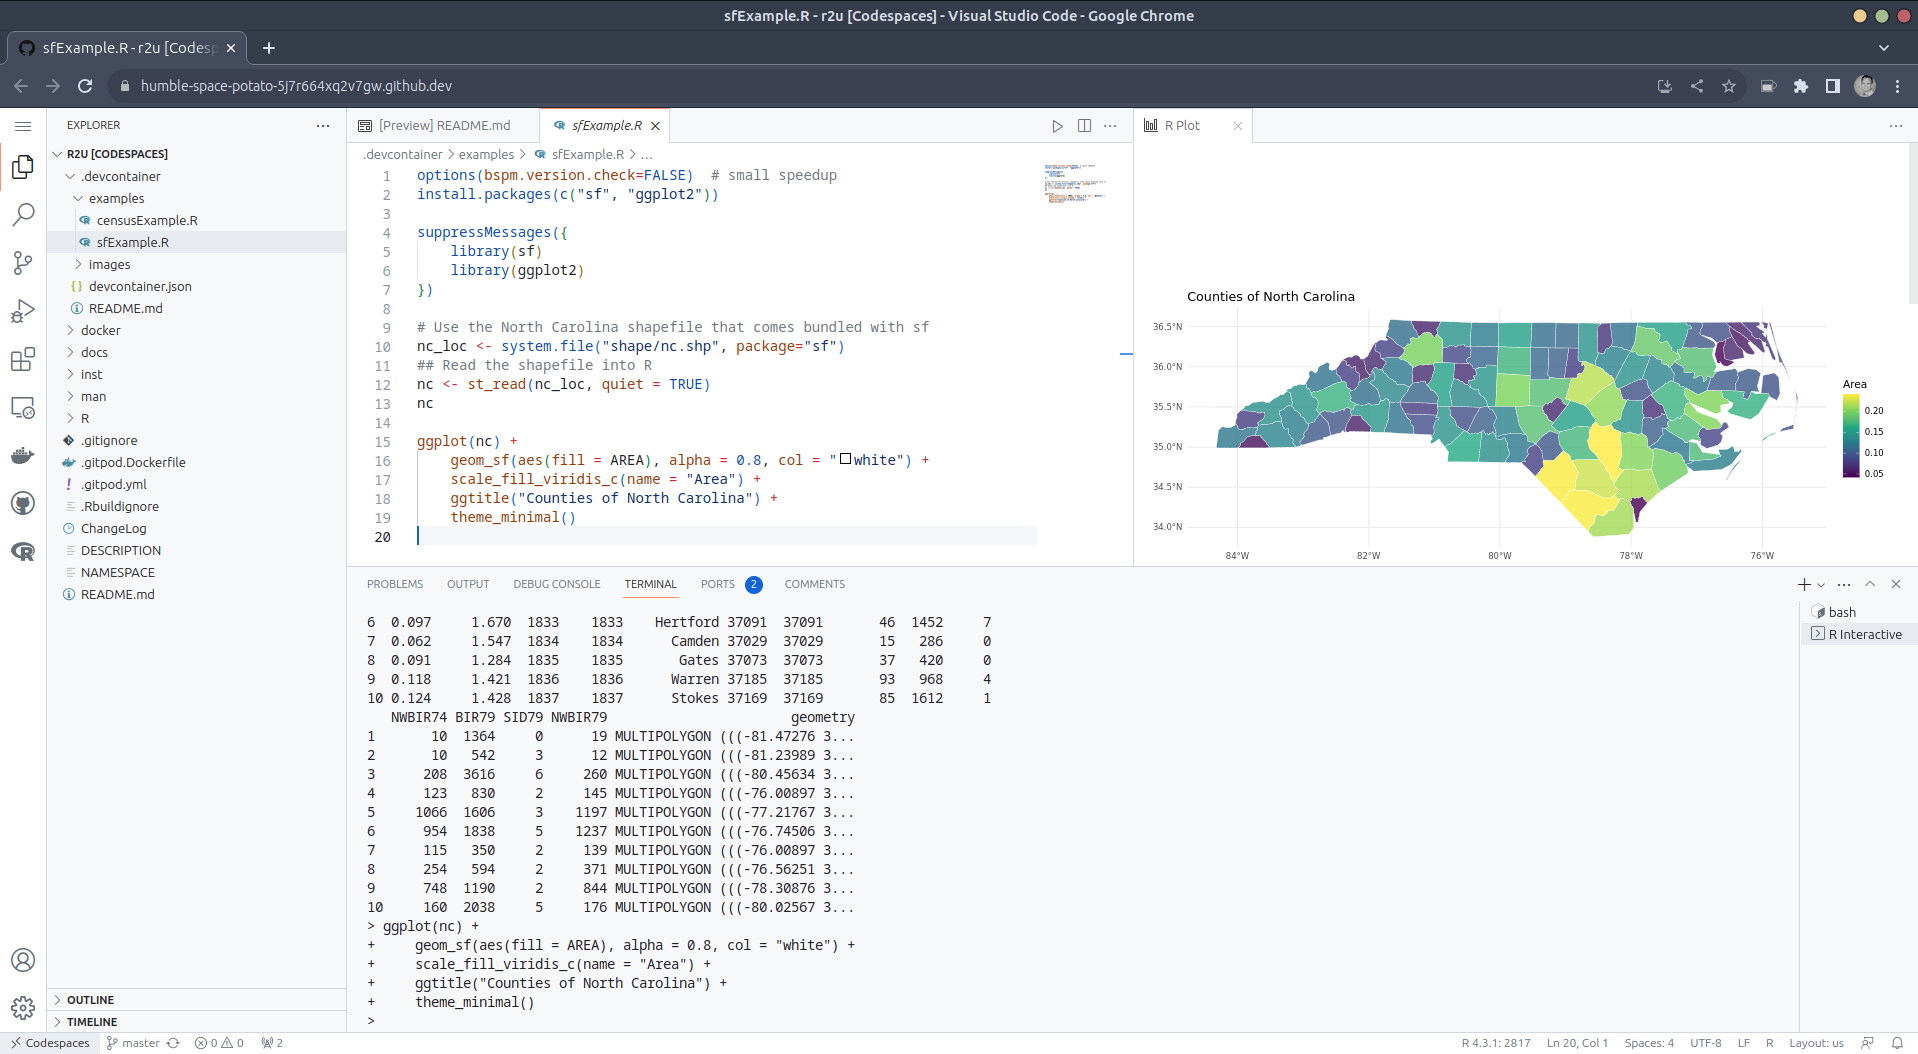
    After the VS Code editor opens up in your browser, feel free to open up the examples/sfExample.R file. It demonstrates how r2u enables us install packages and their system-dependencies with ease, here installing packages sf (including all its geospatial dependencies) and ggplot2 (including all its dependencies). You can run the code easily in the browser environment: Highlight or hover over line(s) and execute them by hitting Cmd + Return (Mac) / Ctrl + Return (Linux / Windows).

    sfExample.png

    (Both example screenshots reflect the initial codespaces-r2u repo as well as personal scratchspace one which we started with, both of course work here too.)

    Do not forget to close your Codespace once you have finished using it. Click the “Codespaces” tab at the very bottom left of your code editor / browser and select “Close Current Codespace” in the resulting pop-up box. You can restart it at any time, for example by going to https://github.com/codespaces and clicking on your instance.

    Extend r2u with r-universe

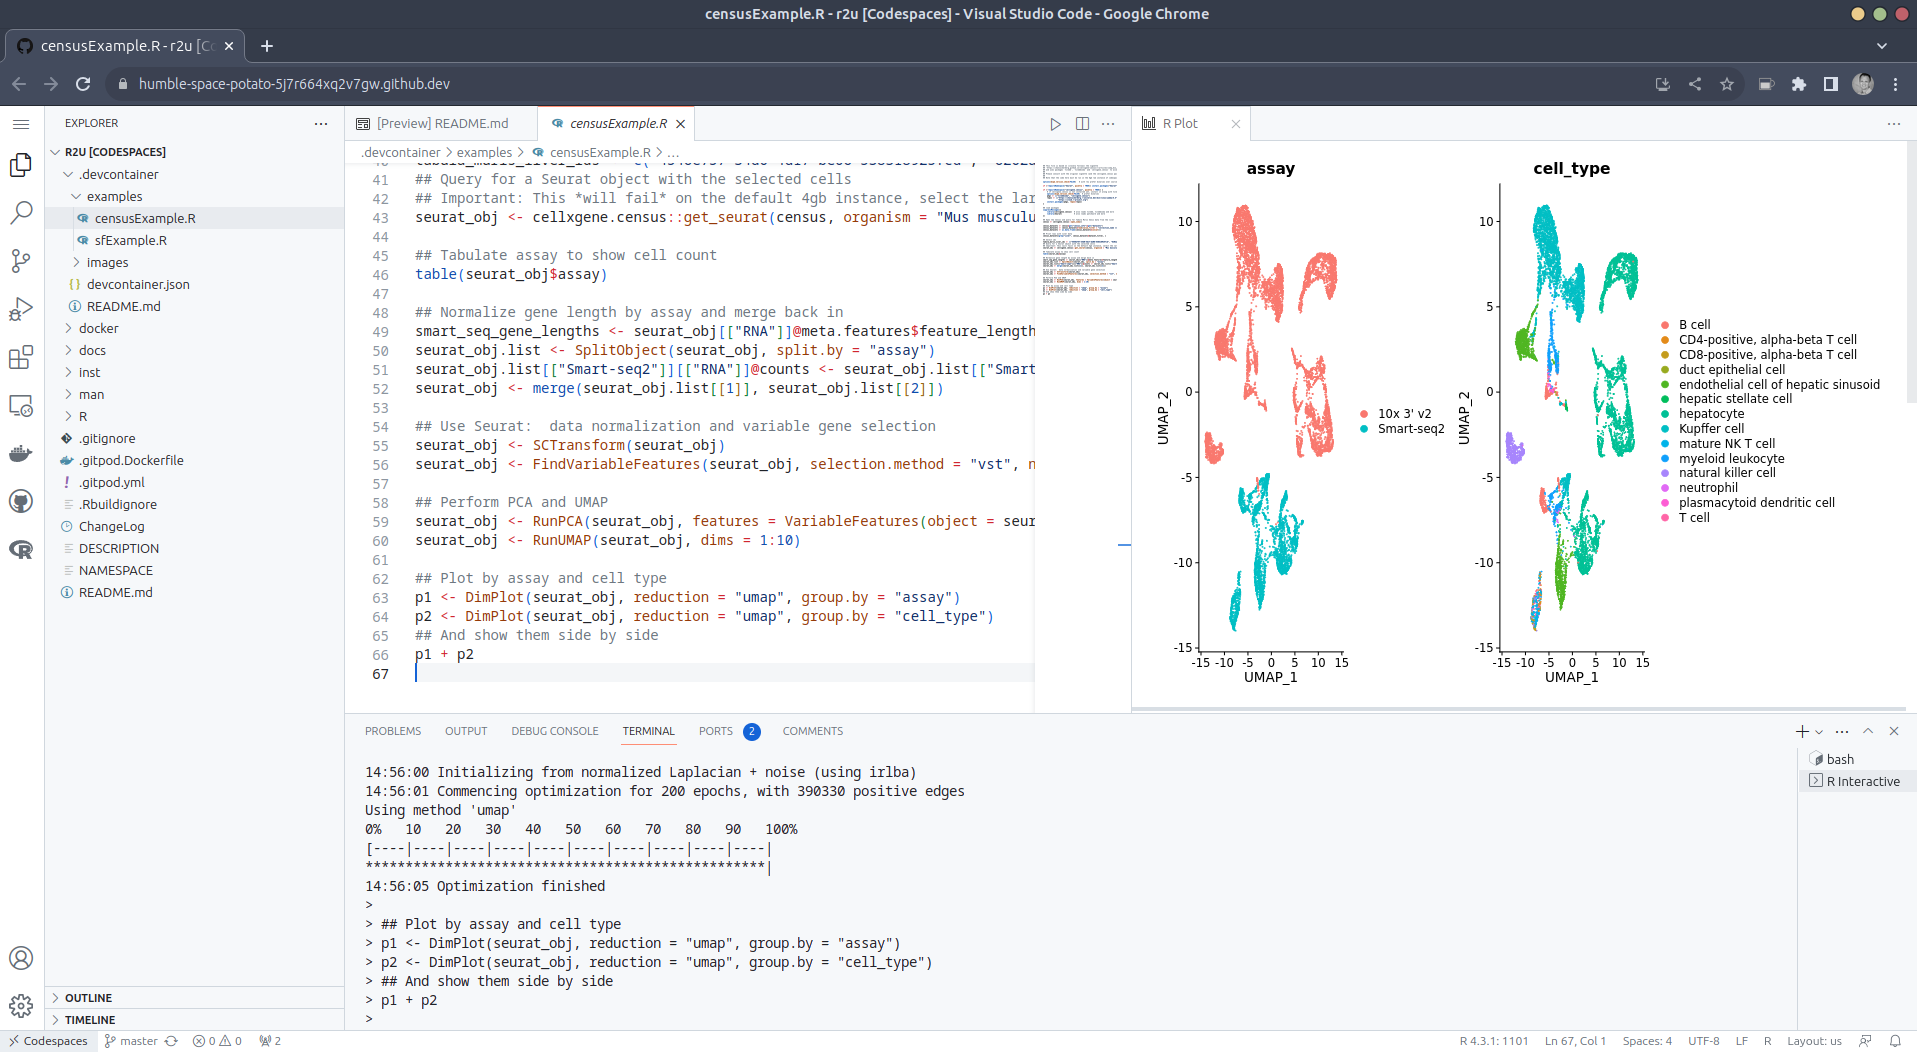
    r2u offers “fast, easy, reliable” access to all of CRAN via binaries for Ubuntu focal and jammy. When using the latter (as is the default), it can be combined with r-universe and its Ubuntu jammy binaries. We demontrates this in a second example file examples/censusExample.R which install both the cellxgene-census and tiledbsoma R packages as binaries from r-universe (along with about 100 dependencies), downloads single-cell data from Census and uses Seurat to create PCA and UMAP decomposition plots. Note that in order run this you have to change the Codespaces default instance from ‘small’ (4gb ram) to ‘large’ (16gb ram).

    censusExample.png

    Local DevContainer build

    Codespaces are DevContainers running in the cloud (where DevContainers are themselves just Docker images running with some VS Code sugar on top). This gives you the very powerful ability to ‘edit locally’ but ‘run remotely’ in the hosted codespace. To test this setup locally, simply clone the repo and open it up in VS Code. You will need to have Docker installed and running on your system (see here ). You will also need the Remote Development extension (you will probably be prompted to install it automatically if you do not have it yet). Select “Reopen in Container” when prompted. Otherwise, click the >< tab at the very bottom left of your VS Code editor and select this option. To shut down the container, simply click the same button and choose “Reopen Folder Locally”. You can always search for these commands via the command palette too ( Cmd+Shift+p / Ctrl+Shift+p ).

    Use in Your Repo

    To add this ability of launching Codespaces in the browser (or editor) to a repo of yours, create a directory .devcontainers in your selected repo, and add the file .devcontainers/devcontainer.json . You can customize it by enabling other feature, or use the postCreateCommand field to install packages (while taking full advantage of r2u ).

    Acknowledgments

    There are a few key “plumbing” pieces that make everything work here. Thanks to:

    Colophon

    More information about r2u is at its site, and we answered some question in issues, and at stackoverflow. More questions are always welcome!

    If you like this or other open-source work I do, you can now sponsor me at GitHub .

    This post by Dirk Eddelbuettel originated on his Thinking inside the box blog. Please report excessive re-aggregation in third-party for-profit settings.


    Značky: #Debian

    • Pl chevron_right

      containers as first-class network citizens

      pubsub.slavino.sk / planetdebian · Thursday, 15 June, 2023 - 14:11 · 1 minute

    I've moved to having containers be first-class citizens on my home network, so any local machine (laptop, phone,tablet) can communicate directly with them all, but they're not (by default) exposed to the wider Internet. Here's why, and how.

    After I moved containers from docker to Podman and systemd , it became much more convenient to run web apps on my home server , but the default approach to networking (each container gets an address on a private network between the host server and containers) meant tedious work (maintaining and reconfiguring a HTTP reverse proxy) to make them reachable by other devices. A more attractive arrangement would be if each container received an IP from the range used by my home LAN, and were automatically addressable from any device on it.

    To make the containers first-class citizens on my home LAN, first I needed to configure a Linux network bridge and attach the host machine's interface to it (I've done that many times before); then define a new Podman network, of type "bridge". podman-network-create (1) serves as reference, but the blog post Exposing Podman containers fully on the network is an easier read (skip past the macvlan bit).

    I've opted to choose IP addresses for each container by hand. The Podman network is narrowly defined to a range of IPs that are within the subnet that my ISP-provided router uses, but outside the range of IPs that it allocates.

    When I start up a container by hand for the first time, I choose a free IP from the sub-range by hand and add a line to /etc/avahi/hosts on the parent machine, e.g.

    192.168.1.33 octoprint.local
    

    I then start the container specifying that address, e.g.

    podman run --rm -d --name octoprint \
            ...
            --network bridge_local --ip 192.168.1.33 \
            octoprint/octoprint
    

    I can now access that container from any device in my house (laptop, phone, tablet...) via octoprint.local .

    What's next

    Although it's not a huge burden, it would be nice to not need to statically define the addresses in /etc/avahi/hosts (perhaps via "IPAM"). I've also been looking at WireGuard (which should be the subject of a future blog post) and combining this with that would be worthwhile.


    Značky: #Debian

    • Pl chevron_right

      Repurposing my C.H.I.P.

      pubsub.slavino.sk / planetdebian · Thursday, 27 April, 2023 - 18:44 · 7 minutes

    Way back at DebConf16 Gunnar managed to arrange for a number of Next Thing Co. C.H.I.P. boards to be distributed to those who were interested. I was lucky enough to amongst those who received one, but I have to confess after some initial experimentation it ended up sitting in its box unused.

    The reasons for that were varied; partly about not being quite sure what best to do with it, partly due to a number of limitations it had, partly because NTC sadly went insolvent and there was less momentum around the hardware. I’ve always meant to go back to it, poking it every now and then but never completing a project. I’m finally almost there, and I figure I should write some of it up.

    TL;DR: My C.H.I.P. is currently running a mainline Linux 6.3 kernel with only a few DTS patches, an upstream u-boot v2022.1 with a couple of minor patches and an unmodified Debian bullseye armhf userspace.

    Storage

    The main issue with the C.H.I.P. is that it uses MLC NAND, in particular mine has an 8MB H27QCG8T2E5R. That ended up unsupported in Linux, with the UBIFS folk disallowing operation on MLC devices. There’s been subsequent work to enable an “SLC emulation” mode which makes the device more reliable at the cost of losing capacity by pairing up writes/reads in cells (AFAICT). Some of this hit for the H27UCG8T2ETR in 5.16 kernels, but I definitely did some experimentation with 5.17 without having much success. I should maybe go back and try again, but I ended up going a different route.

    It turned out that BytePorter had documented how to add a microSD slot to the NTC C.H.I.P. , using just a microSD to full SD card adapter. Every microSD card I buy seems to come with one of these, so I had plenty lying around to test with. I started with ensuring the kernel could see it ok (by modifying the device tree), but once that was all confirmed I went further and built a more modern u-boot that talked to the SD card, and defaulted to booting off it. That meant no more relying on the internal NAND at all!

    I do see some flakiness with the SD card, which is possibly down to the dodgy way it’s hooked up (I should probably do a basic PCB layout with JLCPCB instead). That’s mostly been mitigated by forcing it into 1-bit mode instead of 4-bit mode (I tried lowering the frequency too, but that didn’t make a difference).

    The problem manifests as:

    sunxi-mmc 1c11000.mmc: data error, sending stop command
    

    and then all storage access freezing (existing logins still work, if the program you’re trying to run is in cache). I can’t find a conclusive software solution to this; I’m pretty sure it’s the hardware, but I don’t understand why the recovery doesn’t generally work.

    Random power offs

    After I had storage working I’d see random hangs or power offs. It wasn’t quite clear what was going on. So I started trying to work out how to find out the CPU temperature, in case it was overheating. It turns out the temperature sensor on the R8 is part of the touchscreen driver, and I’d taken my usual approach of turning off all the drivers I didn’t think I’d need. Enabling it ( CONFIG_TOUCHSCREEN_SUN4I ) gave temperature readings and seemed to help somewhat with stability, though not completely.

    Next I ended up looking at the AXP209 PMIC. There were various scripts still installed (I’d started out with the NTC Debian install and slowly upgraded it to bullseye while stripping away the obvious pieces I didn’t need) and a start-up script called enable-no-limit . This turned out to not be running (some sort of expectation of i2c-dev being loaded and another failing check), but looking at the script and the data sheet revealed the issue.

    The AXP209 can cope with 3 power sources; an external DC source, a Li-battery, and finally a USB port. I was powering my board via the USB port, using a charger rated for 2A. It turns out that the AXP209 defaults to limiting USB current to 900mA, and that with wifi active and the CPU busy the C.H.I.P. can rise above that. At which point the AXP shuts everything down. Armed with that info I was able to understand what the power scripts were doing and which bit I needed - i2cset -f -y 0 0x34 0x30 0x03 to set no limit and disable the auto-power off. Additionally I also discovered that the AXP209 had a built in temperature sensor as well, so I added support for that via iio-hwmon .

    WiFi

    WiFi on the C.H.I.P. is provided by an RTL8723BS SDIO attached device. It’s terrible (and not just here, I had an x86 based device with one where it also sucked). Thankfully there’s a driver in staging in the kernel these days, but I’ve still found it can fall out with my house setup, end up connecting to a further away AP which then results in lots of retries, dropped frames and CPU consumption. Nailing it to the AP on the other side of the wall from where it is helps. I haven’t done any serious testing with the Bluetooth other than checking it’s detected and can scan ok.

    Patches

    I patched u-boot v2022.01 (which shows you how long ago I was trying this out) with the following to enable boot from external SD:

    u-boot C.H.I.P. external SD patch
    diff --git a/arch/arm/dts/sun5i-r8-chip.dts b/arch/arm/dts/sun5i-r8-chip.dts
    index 879a4b0f3b..1cb3a754d6 100644
    --- a/arch/arm/dts/sun5i-r8-chip.dts
    +++ b/arch/arm/dts/sun5i-r8-chip.dts
    @@ -84,6 +84,13 @@
     		reset-gpios = <&pio 2 19 GPIO_ACTIVE_LOW>; /* PC19 */
     	};
     
    +	mmc2_pins_e: mmc2@0 {
    +		pins = "PE4", "PE5", "PE6", "PE7", "PE8", "PE9";
    +		function = "mmc2";
    +		drive-strength = <30>;
    +		bias-pull-up;
    +	};
    +
     	onewire {
     		compatible = "w1-gpio";
     		gpios = <&pio 3 2 GPIO_ACTIVE_HIGH>; /* PD2 */
    @@ -175,6 +182,16 @@
     	status = "okay";
     };
     
    +&mmc2 {
    +	pinctrl-names = "default";
    +	pinctrl-0 = <&mmc2_pins_e>;
    +	vmmc-supply = <&reg_vcc3v3>;
    +	vqmmc-supply = <&reg_vcc3v3>;
    +	bus-width = <4>;
    +	broken-cd;
    +	status = "okay";
    +};
    +
     &ohci0 {
     	status = "okay";
     };
    diff --git a/arch/arm/include/asm/arch-sunxi/gpio.h b/arch/arm/include/asm/arch-sunxi/gpio.h
    index f3ab1aea0e..c0dfd85a6c 100644
    --- a/arch/arm/include/asm/arch-sunxi/gpio.h
    +++ b/arch/arm/include/asm/arch-sunxi/gpio.h
    @@ -167,6 +167,7 @@ enum sunxi_gpio_number {
     
     #define SUN8I_GPE_TWI2		3
     #define SUN50I_GPE_TWI2		3
    +#define SUNXI_GPE_SDC2		4
     
     #define SUNXI_GPF_SDC0		2
     #define SUNXI_GPF_UART0		4
    diff --git a/board/sunxi/board.c b/board/sunxi/board.c
    index fdbcd40269..f538cb7e20 100644
    --- a/board/sunxi/board.c
    +++ b/board/sunxi/board.c
    @@ -433,9 +433,9 @@ static void mmc_pinmux_setup(int sdc)
     			sunxi_gpio_set_drv(pin, 2);
     		}
     #elif defined(CONFIG_MACH_SUN5I)
    -		/* SDC2: PC6-PC15 */
    -		for (pin = SUNXI_GPC(6); pin <= SUNXI_GPC(15); pin++) {
    -			sunxi_gpio_set_cfgpin(pin, SUNXI_GPC_SDC2);
    +		/* SDC2: PE4-PE9 */
    +		for (pin = SUNXI_GPE(4); pin <= SUNXI_GPE(9); pin++) {
    +			sunxi_gpio_set_cfgpin(pin, SUNXI_GPE_SDC2);
     			sunxi_gpio_set_pull(pin, SUNXI_GPIO_PULL_UP);
     			sunxi_gpio_set_drv(pin, 2);
     		}


    I’ve sent some patches for the kernel device tree upstream - there’s an outstanding issue with the Bluetooth wake GPIO causing the serial port not to probe(!) that I need to resolve before sending a v2, but what’s there works for me.

    The only remaining piece is patch to enable the external SD for Linux; I don’t think it’s appropriate to send upstream but it’s fairly basic. This limits the bus to 1 bit rather than the 4 bits it’s capable of, as mentioned above.

    Linux C.H.I.P. external SD DTS patch ```diff diff --git a/arch/arm/boot/dts/sun5i-r8-chip.dts b/arch/arm/boot/dts/sun5i-r8-chip.dts index fd37bd1f3920..2b5aa4952620 100644 --- a/arch/arm/boot/dts/sun5i-r8-chip.dts +++ b/arch/arm/boot/dts/sun5i-r8-chip.dts @@ -163,6 +163,17 @@ &mmc0 { status = "okay"; }; +&mmc2 { + pinctrl-names = "default"; + pinctrl-0 = <&mmc2_4bit_pe_pins>; + vmmc-supply = <&reg_vcc3v3>; + vqmmc-supply = <&reg_vcc3v3>; + bus-width = <1>; + non-removable; + disable-wp; + status = "okay"; +}; + &ohci0 { status = "okay"; }; ```


    As for what I’m doing with it, I think that’ll have to be a separate post.


    Značky: #Debian

    • wifi_tethering open_in_new

      This post is public

      www.earth.li /~noodles/blog/2023/04/repurposing-my-chip.html

    • Pl chevron_right

      New feature for FAI.me build service

      pubsub.slavino.sk / planetdebian · Thursday, 27 April, 2023 - 18:25

    After the initial installation of a new machine, you often want to login as root via ssh. Therefore it's convenient to provide a ssh public key for a passwordless login.

    This can now be done by just adding your user name from salsa.debian.org, gitlab.com or github.com. You can also give a customized URL from where to download the keys. Before it was only possible to use a github account name.

    The FAI.me build service then creates a customized installation ISO for you, which will automatically install the ssh public key into the root account. Also the ready-to-boot cloud images support this feature.

    The build service is available on the FAI project website at https://fai-project.org/FAIme


    Značky: #Debian